Bouncer Skywalker Trampoline is one of the most popular trampolines on the market. It is known for its durability and safety features. Assembling a Bouncer Skywalker Trampoline is not difficult, but there are a few things you need to know before you begin.
First, make sure that you have all of the required tools and parts. Second, read the instructions carefully before beginning assembly. Third, take your time and be careful when attaching the springs and mat.
Fourth, test the trampoline before allowing anyone to use it.
- Read all instructions before beginning assembly
- Unfold the trampoline and place it in an open area
- Connect the legs to the frame using the provided bolts and washers
- Tighten the bolts securely
- Assemble the safety enclosure, if included, according to the manufacturer’s instructions
- Place the mat over the frame and secure it with the provided straps or clips
How to Assemble a Skywalker Trampolines 60 Inch Round Seaside Adventure Bouncer with Enclosure
Trampoline Assembly Instructions Pdf
If you’re looking for trampoline assembly instructions, you can find them here. We’ve collected a variety of PDFs from different manufacturers to make it easy for you to find the right instructions for your trampoline.
Just select the manufacturer from the list below and then click on the link to download the PDF.
Once you have the PDF, you can print it out or save it to your computer for future reference.
We hope this page helps you get your trampoline assembled quickly and easily!
Skywalker 36-Inch Mini Hopper Trampoline Assembly Instructions
Assuming you would like a blog post discussing the Skywalker 36-Inch Mini Hopper Trampoline:
The Skywalker 36-Inch Mini Hopper is a great trampoline for both kids and adults alike. It’s small size makes it perfect for indoor use, but it can be used outdoors as well.
The assembly process is simple and only takes a few minutes to complete.
To start, simply unfold the trampoline and place it on a level surface. Next, attach the legs by screwing them into the pre-drilled holes in the frame.
Once all four legs are attached, stretch out the black spring cover and hook it onto the frame. Finally, screw on the protective cap covers over each leg to ensure safety while jumping.
And that’s it!
Your new Skywalker 36-Inch Mini Hopper Trampoline is now assembled and ready for use. Enjoy hours of fun bouncing around both indoors and outdoors with this great little trampoline.
Skywalker 15′ Round Trampoline Assembly Instructions
If you’re looking for detailed instructions on how to assemble a Skywalker 15′ Round Trampoline, you’ve come to the right place! Here’s everything you need to know to get your trampoline up and running in no time:
1. Begin by laying out all of the parts in an open, level area.
Make sure you have all of the necessary tools on hand before getting started (a Phillips head screwdriver will be needed).
2. Next, attach the legs to the bottom of the frame using the included bolts and nuts. Tighten each nut securely with your wrench or socket set.
3. Now it’s time to install the springs! Starting at the outside edge of the trampoline, hook each spring onto its corresponding hole on the frame. Then stretch the spring towards the center of the trampoline and hook it onto another hole.
Repeat this process until all springs are installed (there should be a total of 96).
4. Finally, stretch out the safety pad over top of all ofthe springs and secure it in place with Velcro straps. That’s it – your Skywalker 15′ Round Trampoline is now ready for use!
Skywalker Trampoline Assembly Video
Skywalker Trampoline Assembly Video
If you’re looking for a great way to get your kids active this summer, a trampoline is the perfect solution! The Skywalker trampoline is a great option, and our assembly video will show you how easy it is to put together.
This trampoline features a heavy-duty steel frame and UV-resistant jumping mat, making it built to last. It also has a safety enclosure that surrounds the entire jumping area, so you can be sure your kids are safe while they’re having fun.
The Skywalker trampoline comes in two sizes: 15 feet and 12 feet.
Our assembly video covers both options so you can choose the best size for your backyard.
Putting together a trampoline might seem like a daunting task, but our step-by-step video makes it easy. In just minutes, you’ll have your new trampoline set up and ready for use.
Skywalker 12′ Trampoline Assembly Instructions
The Skywalker 12′ Trampoline is a great addition to any backyard. It’s perfect for kids and adults alike, and it’s easy to assemble. Here are the assembly instructions:
1. Start by attaching the legs to the frame. There are eight legs in total, so make sure they’re evenly spaced out.
2. Next, add the jump mat to the frame.
Make sure it’s centered and pulled tight before you secure it with the spring clips.
3. Now it’s time to add the safety netting. Attach one side of the netting to the top of the frame, then stretch it around and clip it onto the other side of the frame.
4. Finally, add the padding around the outside of the trampoline. This will help protect against bumps and scrapes while you’re jumping around.
That’s it!
Mini Trampoline Assembly Instructions
If you’re looking for a workout that’s low-impact and easy on your joints, a mini trampoline is a great option. These small, portable trampolines are perfect for at-home workouts and can be used indoors or outdoors. While they may seem like simple devices, there are a few things to keep in mind when assembling your mini trampoline.
With these tips, you’ll be up and bouncing in no time!
First, choose a level, flat surface on which to assemble your trampoline. Indoors, this could be a carpeted floor or an exercise mat.
Outdoors, make sure the ground is level and free of any debris that could cause you to trip or fall. Once you have a safe spot selected, it’s time to start putting together your trampoline.
Most mini trampolines come with just a few pieces that need to be connected: the frame, the jumping surface (also called the bed), and the legs.
Begin by attaching the legs to the frame using the included bolts or screws. Make sure each leg is tightened securely before moving on.
Next, attach the jumping surface to the frame using the same method – bolts or screws depending on your model.
Be sure to stretch out the fabric evenly as you attach it so there are no creases or wrinkles in the material. Once both sides are attached, give everything a final tighten and make sure all connections are secure before use.
Now that your mini trampoline is assembled, it’s time to start bouncing!
Remember to stay safe while working out by avoiding any sudden moves or jerky motions that could cause you to fall off balance.
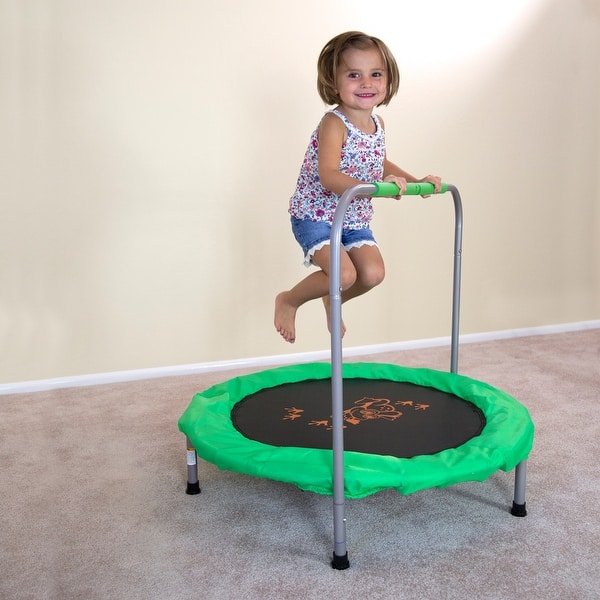
Skywalker Mini Trampoline With Enclosure
The Skywalker mini trampoline with enclosure is a great choice for kids ages 3-10. It’s a perfect size for indoor use, and the padded enclosure provides added safety. The spring-loaded frame is made of heavy duty steel, and the mat is covered in durable PVC.
This trampoline is sure to provide hours of fun for your little ones!
Skywalker 40 Inch Trampoline Instructions
If you’re looking for a fun way to get your kids moving, a trampoline is a great option. The Skywalker 40 Inch Trampoline is a great choice for both indoor and outdoor use. It’s easy to set up and take down, and it comes with clear instructions so you can get started right away.
The Skywalker 40 Inch Trampoline is made with high-quality materials, so you can be sure it will last through years of use. The frame is made of sturdy steel, and the mat is made of durable polypropylene. The trampoline also features 72 springs that provide a smooth bounce.
When setting up the trampoline, be sure to follow the instructions carefully. First, assemble the frame by attaching the legs to the top rail using the included bolts and nuts. Next, stretch out the mat over the frame and secure it in place with the attached clips.
Finally, add the safety enclosure by attaching it to the top rail using the included zip ties.
Once your trampoline is set up, your kids will have hours of fun bouncing around! Just be sure to supervise them at all times while they’re using it.
Credit: www.overstock.com
How Do You Assemble a Skywalker Rectangle Trampoline?
When you purchase a Skywalker rectangle trampoline, it will come unassembled in a box. In order to put your new trampoline together, you will need to follow the instructions that come with it. Here is a general overview of how to assemble a Skywalker rectangle trampoline:
1. Start by laying out all of the parts in the order that they will be assembled. This will help you keep track of everything and make the assembly process go more smoothly.
2. The first step is to attach the legs to the frame.
Make sure that each leg is securely attached before moving on to the next step.
3. Once the legs are attached, you can start attaching the springs to the frame. There are usually around 96 springs, so this part may take some time.
It is important to make sure that each spring is properly secured before moving on.
4. Once all of the springs are in place, you can start attaching the mat to them. Make sure that the mat is properly aligned and secured before moving on.
5 enclosure poles are next! Begin by inserting them into their corresponding holes around the edge of the trampoline frame until they’re flush with both sides then hand-tighten each pole until snug using an Allen wrench (included). Don’t overtighten as this could damage or break poles – just get them nice & tight 🙂 Now do a final check around entire perimeter making sure all bolts/screws are tightened and no tools or extra parts are left behind – we don’t want anyone getting hurt!
If everything looks good, congrats – your new rectangle trampoline is complete and ready for use!
How Do You Assemble a Skywalker 14 Foot Trampoline?
Skywalker 14 foot trampolines are a great way to get some exercise and have fun at the same time. Here is how you can assemble your very own Skywalker 14 foot trampoline:
First, you will need to gather all of the necessary tools and materials.
You will need a Phillips head screwdriver, a socket wrench set, pliers, and an adjustable wrench. You will also need 24-28 bolts (1/2 inch x 3 inches), washers (3/8 inch), lock nuts (3/8 inch), 72 springs (7 inches), 4 legs (24 inches), 1 top rail (96 inches), 1 bottom rail (96 inches), 4 U-bolts (1/2 inch x 3 inches), 8 spring clips, and the instructions.
Next, you will need to find a level spot in your yard to set up the trampoline.
Once you have found the perfect spot, lay out the bottom rail on the ground and attach the legs using the U-bolts. Make sure that the legs are evenly spaced out before tightening down the bolts.
Now it is time to start attaching the springs.
Start by attaching one spring at each corner of the bottom rail using the spring clips. Next, work your way around attaching springs every 6-8 inches until all of them are attached. Be sure to alternate between outer and inner springs as you go along so that they are evenly distributed around the perimeter of the trampoline.
Now it is time to connect the top rail tothe legs using more U-bolts. Again, make sure that everything is lined up correctly before tightening down all ofthe bolts. Once everything is bolted together securely, flip overthetrampoline so that itis right side up againand give ita bounce testto make surethatitis sturdyand readyfor use!
How Do You Assemble a Skywalker 12 Foot Trampoline?
Assuming you have all the required parts and tools, assembling a Skywalker 12 foot trampoline is a relatively easy process that should take no more than an hour or two. Here are the basic steps:
1. Start by spreading out the trampoline’s frame on level ground.
If you’re doing this on grass, it’s a good idea to put down a tarp first to protect the trampoline from getting damaged.
2. Next, attach the spring pads around the edge of the frame using the provided bolts and nuts. Make sure to tighten these securely so that they don’t come loose while in use.
3. Now it’s time to start attaching the springs themselves. There should be 96 springs in total (48 short springs and 48 long springs). Begin by hooking one end of each spring onto the corresponding hole on the trampoline frame.
Then stretch out the spring and hook its other end onto an adjacent hole until all 96 springs are in place.
4. The next step is to install the safety enclosure, if you’re using one. First, assemble the poles according to instructions and then insert them into their sleeve openings around the edge of the trampoline mat.
Once all poles are in place, connect them at each corner using either zip ties or clips (depending on what type of enclosure you have).
5 Finally, give everything a once-over to make sure everything is tight and secure before letting anyone jump on it!
How Do I Fix My Skywalker Trampoline?
If your Skywalker trampoline isn’t working properly, there are a few things you can do to try and fix it. First, check all of the bolts to make sure they are tight. Next, check the frame to see if there are any cracks or damage.
If you find any damage, you will need to replace the part. Finally, check the mat and springs to see if they are in good condition. If they are worn out, you will need to replace them.
Conclusion
This blog post provides easy-to-follow instructions for assembling a Bouncer Skywalker trampoline. The blogger breaks down the process into simple steps, with accompanying photos, to make it as straightforward as possible. They also provide helpful tips along the way, such as which tools you’ll need and how to ensure that the trampoline is level.
With these clear instructions, anyone should be able to have their new trampoline up and ready to use in no time!