If your trampoline has a broken spring, don’t despair! With a few tools and some elbow grease, you can fix it in no time. Here’s what you’ll need to do:
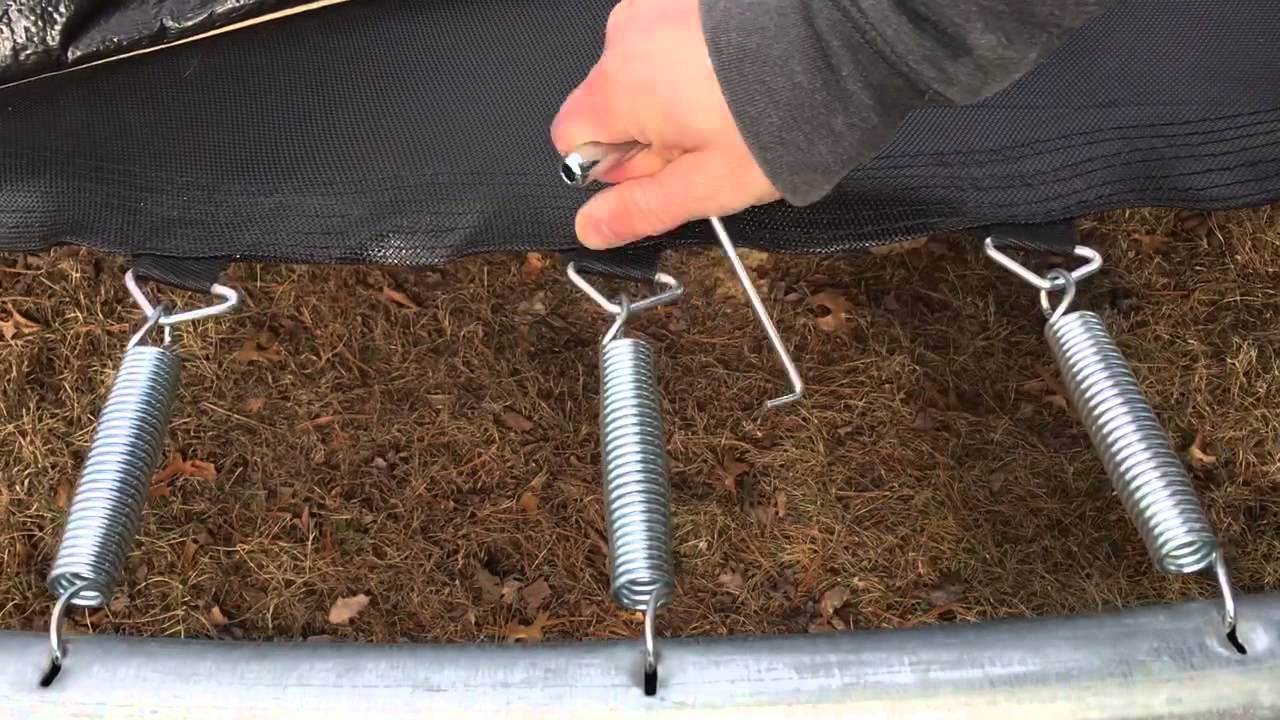
First, remove the mat from the frame of the trampoline. This will give you access to the springs. Next, use a pliers to remove the damaged spring from the frame.
Once the spring is out, measure it against a new one to make sure you get the right size. Then, simply attach the new spring to the frame using the pliers. Finally, put the mat back on and enjoy your newly-fixed trampoline!
- Remove the broken spring from the trampoline using a pair of pliers
- Cut a new spring to the same length as the old one using a hacksaw
- Attach the new spring to the trampoline frame using a clamp or vise grip
- Secure the other end of the spring to the mat using another clamp or vise grip
- Test the trampoline by jumping on it to make sure that the springs are secure and functioning properly
How to fix broken spring tabs on a trampoline.
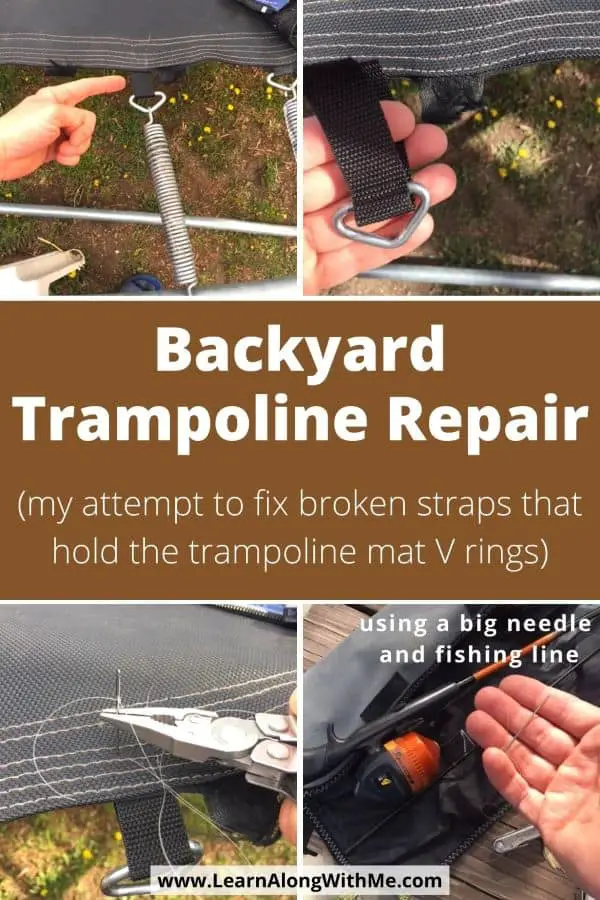
How to Replace Trampoline V-Rings
If your trampoline is starting to show signs of wear and tear, it may be time to replace the v-rings. V-rings are an important part of the trampoline, as they help to keep the mat in place and provide a smooth jumping surface. Here’s a step-by-step guide on how to replace trampoline v-rings.
1. Measure the diameter of your trampoline’s frame tubes and order replacement v-rings that are slightly smaller in diameter. This will ensure that the v-rings fit snugly onto the frame tubes.
2. Remove the old v-rings from the frame tubes by gently pushing them off with your hands or using a flathead screwdriver to pry them loose (if they’re really stuck).
3. Clean any rust or debris off of the frame tubes before adding the new v-rings. This will help ensure that the new v-rings last longer.
4. Wet one end of each new v-ring with water and slide it onto a frame tube, making sure that it’s seated properly in all of the notches on the tube.
Repeat for all remaining frame tubes/v-rings. Allow the newly installed v-rings to dry completely before using your trampoline again (this usually takes about 24 hours).
Trampoline Stitching Repair
If you’re lucky enough to own a trampoline, you know how much fun they can be. But like any piece of equipment, they require some maintenance from time to time. One common issue that can occur is tears in the stitching of the fabric.
This is usually caused by overuse or improper assembly/disassembly.
Luckily, this is an easy problem to fix with just a little bit of needle and thread (or a sewing machine). Just follow these simple steps:
1. Inspect the tear to determine how large it is and where it is located. If it’s a small hole, you can simply sew it shut with a needle and thread. If it’s a larger tear, you may need to patch it with a piece of fabric first.
2. Clean the area around the tear so that there is no dirt or debris present.
3. Sew the tear closed using a needle and thread (or sewing machine), making sure to backstitch at the beginning and end for extra strength.
4. Trim any excess thread from around the repair and voila!
Your trampoline is as good as new!
Trampoline Straps Replacement
If your trampoline straps need replacing, you have come to the right place! This guide will teach you everything you need to know about replacing your trampoline straps, so that you can get back to bouncing in no time.
What You Will Need:
-Measuring tape
-Scissors
-New trampoline straps (can be purchased online or at a local hardware store)
-Ladder (if necessary)
Instructions:
1. Use a measuring tape to measure the circumference of your trampoline frame.
This will determine how many and what size new straps you will need to purchase.
2. Cut the old straps off of the frame using scissors. Make sure that all of the metal clasps are removed as well.
If any are still attached, they can be pried off with a flathead screwdriver.
3. Take one end of a new strap and attach it to the frame using the metal clasp. Repeat this process until all of the new straps are in place.
4. If necessary, use a ladder to reach the top of the trampoline and secure the final strap in place.
Trampoline Replacement Parts
If your trampoline parts are starting to wear out, it’s time to start thinking about replacements. But where do you find quality trampoline parts? And how do you know which ones you need?
Here at Trampoline Parts and Supply, we carry a wide variety of replacement parts for all types of trampolines. Whether you need a new mat, springs, pads, or anything else, we’ve got you covered.
We only carry parts from the top manufacturers in the industry, so you can rest assured that your replacements will be just as good as the originals.
And if you’re not sure exactly what you need, our team of experts is always happy to help.
So don’t wait any longer, order your replacement trampoline parts today!
Trampoline Repair
If you’re like most people, your trampoline gets a lot of use throughout the spring and summer months. But what happens when it starts to show signs of wear and tear? That’s where trampoline repair comes in!
There are a few different things that can go wrong with a trampoline, but the most common issue is holes developing in the jumping surface. These holes can be caused by UV damage, tears from vigorous use, or simply old age. Regardless of how they’re caused, though, they need to be repaired as soon as possible to avoid further damage and injury.
Fortunately, repairing holes in a trampoline is relatively easy to do. You’ll just need some heavy-duty sewing thread and a needle that can accommodate it. Start by threading the needle and then tying a knot at the end of the thread.
Next, insert the needle into one side of the hole and then bring it up through the other side. Continue doing this until you’ve gone all the way around the hole; then tie off the thread on the underside of the jumping surface.
Once you’ve repaired any holes in your trampoline, it’s important to take steps to prevent them from happening again in the future.
One way to do this is to invest in a cover specifically designed for your trampoline; these covers will help protect against UV damage and extend its lifespan significantly. Additionally, make sure that you’re only allowing responsible adults and children to use it; too much weight on an old or damaged trampoline can cause irreparable harm. With proper care and maintenance, your trampoline will provide years of fun!
Trampoline Springs
In order to have a successful and safe trampoline, it is important to have quality springs. Springs are essential to provide the “bounce” for which trampolines are known. All springs are not created equal, however, and there are certain features that you should look for when purchasing springs for your trampoline.
Here are some things to keep in mind:
-The number of springs: This will directly affect the amount of bounce your trampoline can provide. More springs means more bounce.
However, too many springs can also be dangerous as they can increase the risk of injury if someone falls off the trampoline. The ideal number of springs depends on the size and weight limit of your trampoline.
-The length of the spring: Longer springs will also provide more bounce.
However, they need to be properly secured at both ends or they could pose a safety hazard. Shorter springs may not give you as much bounce, but they will be easier to secure.
-The gauge of the spring: This refers to the thickness of the wire used to make the spring.
The thicker the gauge, the higher quality (and usually more expensive) the spring will be. Higher quality springs will last longer and provide better performance than lower quality ones.
V-Rings for Trampoline
If you have a trampoline, you need V-rings! V-rings are an essential part of any trampoline, as they provide the tension that keeps the mat tight and springy. Without V-rings, your trampoline would be useless.
There are two types of V-rings: those that go around the outside of the frame, and those that go around the inside of the frame. Both types are equally important, as they both provide tension to keep the mat tight. The only difference is that the ones on the outside of the frame also help to keep the legs from moving too much.
V-rings are usually made from metal or plastic, and come in various sizes. You will need to make sure that you get the right size for your trampoline, as too small or too big V-rings can cause problems. If you’re not sure what size you need, it’s best to consult with a professional before making your purchase.
Once you have your V-rings, installation is relatively simple. Just thread them through the appropriate holes on your trampoline frame and then secure them with washers and nuts (or bolts). Make sure that everything is tightened properly so that there is no risk of anything coming loose while you’re using your trampoline.
That’s all there is to it! With proper care and maintenance, your V-rings should last for many years without needing to be replaced. So get out there and enjoy your bouncy backyard fun – just don’t forget to put those V-rings on first!
Trampoline Triangle Rings
A trampoline is a great way to get some exercise, and they’re also a lot of fun. But what if you want to take your trampoline game to the next level? That’s where trampoline triangle rings come in!
Trampoline triangle rings are a great way to add some excitement to your trampoline sessions. They can be used for a variety of games and exercises, and they’re also a lot of fun to just bounce around on. Here are a few ideas on how to use them:
– Use them as targets for shooting hoops or playing catch.
– Set up an obstacle course by jumping over or under the rings.
– See how long you can stay inside one of the rings without touching the ground.
– Have a competition with friends or family members to see who can do the most flips in a row while going through the rings.
If you’re looking for a way to add some extra fun to your trampoline sessions, then be sure to check out trampoline triangle rings!
Credit: www.youtube.com
How Do You Fix a Broken Spring Tab on a Trampoline?
If you have a broken spring tab on your trampoline, there are a few things you can do to fix it. Depending on the severity of the break, you may be able to just replace the broken tab. If the break is more severe, you may need to replace the entire spring.
To replace a broken tab, first remove the mat from the trampoline. Then, using a pair of pliers, remove the old tab from the end of the spring. Next, take your new tab and insert it into the end of the spring.
Finally, reattach the mat to the trampoline frame and enjoy your newly fixed trampoline!
If you need to replace an entire spring, follow these steps. First, remove all of the springs from the trampoline frame.
Next, measure each spring so that you order replacements that are exactly the same size. Once your new springs arrive, attach them to either end of the trampoline frame according to their manufacturer’s instructions. Finally, reattach your jump mat and enjoy your newly fixed trampoline!
Can You Use a Trampoline With One Broken Spring?
A trampoline with one broken spring is not safe to use and should be repaired as soon as possible. Depending on the severity of the break, the trampoline may be able to support a limited amount of weight, but it is not advisable to attempt any flips or other stunts. Once the broken spring is replaced, the trampoline will be back to its original strength and can be used without fear of injury.
Why Do Trampoline Springs Break?
If you’re the owner of a trampoline, chances are you’ve had to replace at least one spring. But why do they break in the first place? There are actually several reasons why trampoline springs break, and understanding them can help you prolong the life of your springs (and save you some money in the process).
The most common reason for a broken spring is simply wear and tear. Trampolines see a lot of use, and over time, the springs will start to weaken and eventually snap. This is especially true if your trampoline is used frequently or by heavier people.
Another reason springs break is because they rust. If your trampoline is kept outside, it’s exposed to all kinds of weather conditions that can cause rusting. Once a spring starts to rust, it weakens significantly and is much more likely to break.
Improper installation can also lead to broken springs. If your springs are not installed correctly or tightened properly, they will be under too much strain and are more likely to snap. This is something to keep in mind if you’re planning on replacing your own springs.
Finally, manufacturing defects can occasionally result in a spring breaking prematurely. While this isn’t something you can control, it’s important to know that it does happen from time to time so you’re not caught off guard if one of your springs breaks unexpectedly.
Now that you know some of the main reasons why trampoline springs break, you can take steps to prevent it from happening (or at least minimize the risk).
Be sure to inspect your Springs regularly for any signs of weakness or damage, and replace them as needed so they don’t have a chance to break on their own. Also make sure they’re installed properly and never put under too much strain (for example, by allowing more than one person on the trampoline at a time). By taking these precautions, you can help ensure that your trampoline Springs last longer – giving you more hours of fun!
How Do You Put a Spring Back On?
If your garage door is making a loud creaking noise every time you open it, there’s a good chance the springs need to be replaced. But before you attempt this repair yourself, keep in mind that working with garage door springs can be very dangerous. They’re under a lot of tension and if they snap, they can cause some serious injuries.
So unless you have the experience and the proper tools, we recommend leaving this job to a professional.
But if you do decide to tackle it yourself, here are the steps you need to take:
1. First, disconnect the opener from the power source so that there’s no risk of being electrocuted while you work on the springs.
Then, open up the garage door manually until it’s fully open. If it’s too heavy to lift by hand or if the springs are already broken, don’t try to force it open as this could cause further damage.
2. Once the door is open, locate the spring (or springs) on either side of the door near where the tracks curve upward into an “S” shape.
There will be two different types of springs – torsion springs located abovethe tracks and extension springs located below them. If your door has only one spring (located either above or below), then it needs to be replaced with two new ones because single-spring doors are no longer safe or code-compliant in most states.
Conclusion
If your trampoline has a broken spring, don’t worry! You can easily fix it with a few tools and some patience. First, remove the damaged spring from the trampoline frame.
Then, measure the new spring to make sure it is the same size as the old one. Once you have the correct size spring, attach it to the trampoline frame using pliers. Finally, test out your trampoline to make sure it is safe and ready for use!