If you have a round trampoline, it is most likely that it has V-rings holding the jumping mat to the frame. Over time, these V-rings can become worn and need to be replaced. This process is actually quite simple and only takes a few minutes to do.
You will need to purchase new V-rings that are compatible with your trampoline model – make sure to get the right size!
- Remove the mat from the trampoline frame by undoing the spring clips or bolts
- Inspect the V-rings for wear and tear
- If they are damaged, they will need to be replaced
- Purchase new V-rings that are compatible with your trampoline model
- Install the new V-rings by stretching them over the edge of the trampoline mat and attaching them to the springs with clips or bolts
- Put the mat back on the frame and test it out to make sure everything is secure before allowing anyone to jump on it
Replacing V rings and springs on trampoline
Trampoline Stitching Repair
If you have a trampoline with a hole in it, don’t despair! You can easily repair the hole yourself with a little bit of know-how and some basic sewing supplies.
First, gather your materials.
You will need a needle and thread, scissors, and a piece of fabric large enough to cover the hole. A patch kit made specifically for trampolines is also helpful, but not required.
Next, cut a square or rectangle of fabric that is slightly larger than the hole in the trampoline.
Center the fabric over the hole and begin stitching it in place using a simple running stitch. Start at one corner and work your way around all four sides of the patch until it is securely attached.
If you are using a patch kit, follow the instructions included with it to attach the patch.
Otherwise, simply tie off your thread on the underside of the trampoline when you are finished stitching.
Your trampoline is now repaired and ready for use!
Trampoline Top Ring Replacement
If you’re in need of a trampoline top ring replacement, you’ve come to the right place! Here at TrampolinePartsandSupply.com, we carry a wide selection of top rings to fit all budgets and needs. Whether you’re looking for a replacement for a worn out or damaged ring, or simply want an upgrade for your current setup, we have what you’re looking for.
When choosing a new top ring, it’s important to take into account the size of your trampoline and the weight limit of the ring. We carry rings that range in size from 8 feet to 16 feet in diameter, so there’s sure to be one that’s perfect for your trampoline. And with weight limits ranging from 250 pounds to 600 pounds, we have options for everyone from kids to adults.
Once you’ve selected the perfect ring for your trampoline, installation is quick and easy. Most rings come with all the necessary hardware and instructions, so you can get it set up and ready to use in no time. And if you have any questions along the way, our team of experts is always happy to help!
Trampoline Rings
A trampoline ring is a safety device that is attached to the outside of a trampoline. It is designed to help keep people from falling off of the trampoline and injuring themselves. The ring goes around the entire circumference of the trampoline and is usually made out of foam or another soft material.
How to Fix Trampoline
If your trampoline looks like it needs a little love and attention, don’t worry – it’s not difficult to give it a little TLC. With just a few simple steps, you can have your trampoline back in tip-top shape in no time.
First things first: safety is always the number one priority when working on or around your trampoline.
Make sure that the surface of your trampoline is completely dry before beginning any repair work. Also, be sure to disconnect the power supply to any electrical components on or near the trampoline before starting.
Once you’ve taken care of the safety precautions, take a close look at your trampoline.
Are there any areas that look worn or frayed? If so, those will need to be repaired or replaced before continuing. Check all of the bolts and screws on the frame to make sure they are tight and secure; if any are loose, tighten them up with a wrench.
Inspect all of the springs and matting to ensure there are no rips or tears; if there are, patch them up with some heavy-duty adhesive tape. Finally, take a look at the netting surrounding the perimeter of the jump surface – is it ripped or torn in places? If so, patches or replacement netting can be easily sourced from most sporting goods stores.
With all of those visual inspections complete, it’s now time to give your trampoline a good bounce test! This will help identify any areas that may need further attention. If everything looks good after giving it a once-over, then congratulations – you’ve successfully fixed your trampoline!
Trampoline Thread
A trampoline thread is a type of sewing thread that is used to create a temporary stitch. This type of thread is often used when basting or gathering fabric. It is also sometimes used in quilting and applique.
Trampoline threads are typically made from polyester or nylon and are available in a variety of colors.
Zero Gravity V Ring
Assuming you would like a blog post discussing the scientific phenomenon of zero gravity:
Have you ever wondered what it would be like to defy gravity? To have the sensation of floating in space?
Well, there’s actually a way to experience this phenomena without having to leave Earth! It’s called Zero Gravity, and it’s an exhilarating way to give your body a break from the constant force of gravity.
What is Zero Gravity?
Zero Gravity is the name given to the state of apparent weightlessness that can be achieved by aircrafts in free fall. The effects of Zero Gravity are similar to those experienced by astronauts in space and can last for up to 30 seconds at a time. During this short period, you will feel as though you are floating weightlessly in space!
How does it work?
The key to achieving Zero Gravity is timing. The pilot of the aircraft must carefully control the descent so that at the moment of greatest altitude loss, all occupants of the plane experience weightlessness simultaneously.
This is usually done by flying in a series of parabolas; each one begins with a period of positive G-force (where you are pressed firmly into your seat), followed by a brief period of weightlessness at the apex, before finally returning to negative G-force (as the plane pulls out of its dive). This rollercoaster ride provides passengers with a thrilling taste of what it’s like to live and work in space!
Is it safe?
Yes! Although it may feel strange at first, people quickly adapt to the sensation of floating in mid-air and find it very enjoyable. There have been over 50,000 people who have taken part in zero gravity flights since they began in 1989 and there has never been an accident.
So if you’re looking for an exciting way to defy gravity, why not give Zero Gravity a try?
Trampoline Assembly Problems
If you’re the proud owner of a new trampoline, congratulations! Trampolines are a great way to get some exercise, have some fun, and spend time with family and friends. But before you can start jumping for joy, you need to assemble your trampoline.
And that’s where things can sometimes go wrong.
There are a few common problems that people run into when assembling their trampolines. Here are some tips on how to avoid these pitfalls and successfully assemble your trampoline.
One problem is not following the instructions correctly. It may seem like an obvious thing to do, but you’d be surprised how many people try to wing it without reading the instructions first. Take the time to read through the assembly instructions thoroughly before starting.
That way you’ll know exactly what steps need to be taken in what order.
Another problem is not having all of the necessary tools on hand before starting assembly. Again, this seems like it should be obvious, but it’s easy to forget something when you’re in the middle of putting together a complex piece of equipment like a trampoline.
Make sure you have everything you need – including any power tools – before starting assembly. Otherwise you’ll just end up frustrated and wasting time as you search for that missing wrench or drill bit.
A third issue that can arise during trampoline assembly is mismatched or damaged parts .
This is usually due to incorrect packaging by the manufacturer , but it can also happen if pieces get mixed up during shipping . If you find yourself in this situation , don’t despair ! Most manufacturers will gladly send replacement parts at no charge if there was an error on their part .
However , if damage occurred during shipping , then you may have to pay for replacements out of pocket . Either way , it’s always best to check your parts against the list in the instructions BEFORE beginning assembly . That way , if there are any discrepancies , they can be dealt with ahead of time instead of causing delays later on .
Putting together a trampoline can be challenging, but following these tips will help ensure a smooth process from start to finish.
Trampoline Sewing Repair Kit
If you’re like most people, you probably take your trampoline for granted. That is until it starts to show signs of wear and tear. Then, all of a sudden, you realize just how important this piece of equipment is to your family’s enjoyment.
The good news is that there are some easy ways to keep your trampoline in tip-top shape. One of the best things you can do is invest in a trampoline sewing repair kit.
These kits come with everything you need to fix small tears or holes in your trampoline’s fabric.
They’re relatively inexpensive and can be a lifesaver when it comes to prolonging the life of your trampoline.
When shopping for a repair kit, make sure to get one that includes both patches and thread. This way, you’ll be prepared for any type of repair that might come up.
And don’t forget to check the size of the patches – you want them to be big enough to cover the entire hole or tear.
With a little bit of care and attention, your trampoline will be able to provide years of fun and exercise for your family. So don’t wait until it’s too late – get a sewing repair kit today!

Credit: www.amazon.com
Can You Replace V Rings on a Trampoline?
If your trampoline has V-rings, you may be wondering if they can be replaced. The answer is yes, but it’s not as simple as just buying new V-rings. You will also need to purchase a new mat and frame pad, as the old ones will not work with the new rings.
Here’s what you need to know about replacing V-rings on a trampoline.
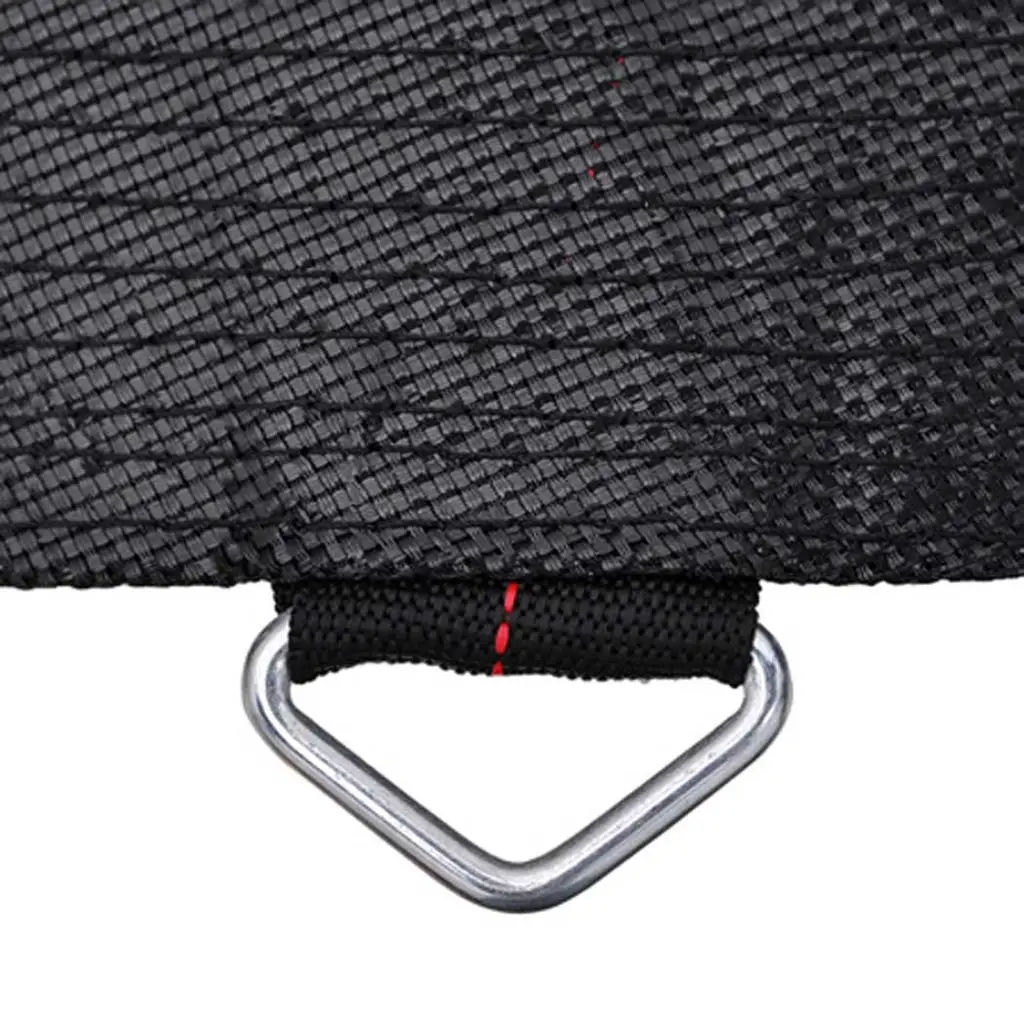
V-rings are made of metal and are attached to the mat of the trampoline with hooks. They create a “V” shape when viewed from above, hence their name.
Over time, these metal rings can become bent or broken, which can cause the mat to tear. If this happens, it’s time to replace the V-rings.
To do this, you will need to purchase a new set of V-rings and a new mat (or frame pad).
The reason for this is that the old mat or frame pad will not work with the new rings – they are different sizes. Once you have your new materials, follow these steps:
1) Remove the old mat or frame pad from the trampoline.
This will expose the hooks that hold on the V-rings.
2) Using pliers, remove each of the old V-rings from its hook. Be careful not to damage the hooks in doing so – we’ll need them later!
3) Take one of the new V-rings and place it over a hook. Gently bend down one side ofthe ring until it fits snugly overthe hook (it should look like an upside down “U”). Do this for all four cornersofthe ring .
Repeat with remaining three rings . Ensure that all four sidesofeach ring are equally snug against their respective hooks .
4) Place themat ontoethese newly installed rings . Start atoneendand stretchit outoverthe entire circumferenceofthetrampoline , being sureto tuckit underallfour sets offingers(thiswill help keepittautand prevent wrinkling). Whenyou reachtheother end ,pulltightlyand useclamps topinchedownthat endofthemat ontoetheframe(Youcan findtheseclamps atmosthardwarestores).Repeatthis sameprocessfortheframepad , ifyou haveone(Skipthisstepifyou’reonlyreplacingthemattress ).
5) That’sit !
How Do V Rings Attach to Trampoline?
A v-ring is a metal ring with a v-shaped cross section that is used to attach the trampoline mat to the frame. The v-ring fits over the end of the frame tube and then the mat is laced through the ring. There are typically 8 v-rings per frame, but some trampolines have more or less.
How Do You Reattach a Spring on a Trampoline?
If you have a loose or broken spring on your trampoline, don’t worry – it’s an easy fix! All you need is a new spring and a few basic tools. Here’s how to do it:
1. First, remove the old spring by unscrewing the bolts that hold it in place. If the spring is really tight, you may need to use a wrench or pliers to help loosen the bolts.
2. Once the old spring is removed, simply line up the new one in its place and screw in the bolts to secure it.
Make sure that the springs are evenly spaced and tensioned before using the trampoline again.
3. That’s it! Your trampoline should now be as good as new.
How Do You Fix the Webbing on a Trampoline?
If you have a trampoline with damaged or broken webbing, there are a few things you can do to fix it. Depending on the severity of the damage, you may be able to repair it with some simple home repairs. But if the webbing is severely damaged, you’ll likely need to replace it.
To start, inspect the webbing for any holes or tears. If there are only a few small holes, you can try patching them with duct tape or another strong adhesive. For larger holes or tears, you’ll need to cut out the damaged section and sew in a new piece of webbing.
If the damage is too severe to repair, you’ll need to replace the entire piece of webbing. You can purchase replacement webbing at most hardware stores or online. To install it, simply remove the old webbing and attach the new one in its place.
Be sure to use heavy-duty staples or screws to secure it in place so it doesn’t come loose while someone is using the trampoline.
With a little bit of effort, you can easily fix broken trampoline webbing and get your trampoline back up and running again in no time!
Conclusion
If your trampoline’s v-rings are beginning to wear out, it’s important to replace them before they break. Luckily, this is a relatively easy process that only requires a few tools.
First, remove the old v-rings from the frame of the trampoline.
You’ll need a screwdriver or drill to do this. Next, measure the new v-rings to make sure they’re the right size. Once you have the correct size, put them in place on the frame and secure them with screws or bolts.
That’s it! Now your trampoline is ready for action again.