A 12-foot trampoline is a great addition to any backyard. They are perfect for kids and adults alike, and they can provide hours of fun and exercise. Here are some tips on how to set up a 12-foot trampoline.
- Read the manufacturer’s instructions carefully before starting to set up the trampoline
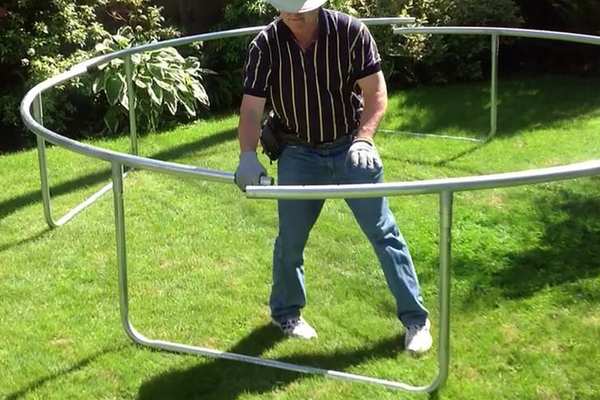
- Lay out the frame and legs on level ground, making sure that all the parts are there and undamaged
- Assemble the frame according to the instructions, using any tools that may be required
- Stretch out the mat over the frame, making sure that it is taut and correctly positioned
- Secure the mat to the frame with the springs or straps provided, again following the manufacturer’s instructions
- 6 Test
Skywalker Trampolines 12 ft. Round Trampoline Assembly Video
Trampoline Setup Instructions
Are you looking for a fun way to get fit? A trampoline is a great option! Not only is it a great workout, but it’s also a lot of fun.
Before you can start bouncing away, though, you need to set up your trampoline. This process is actually pretty simple, and we’ll walk you through it step-by-step.
First, find a level spot in your yard for the trampoline.
You’ll want to make sure that the ground is level so that the trampoline doesn’t wobble when you’re using it. Once you’ve found the perfect spot, clear away any debris or rocks that might be in the way.
Next, lay out the base of the trampoline on the ground.
If your model has legs, attach them now. Then, start assembling the frame of the trampoline according to the instructions that came with it. Once the frame is together, stretch out the jumping surface and hook it onto the frame.
Now comes time for some safety precautions! Attach the safety netting around the outside of the trampoline (if your model has one). This will help keep anyone from bouncing off and falling off ofthe sides ofthetrampoline.
Finally, test outyour new toy by giving ita little bounce! If everything feels secure and sturdy, you’re readyto start having some fun!
How to Put a Net on a 14Ft Trampoline
If your trampoline didn’t come with a net or you need to replace an old one, don’t worry – it’s not difficult to put a net on a 14ft trampoline. Here’s what you’ll need to do:
1. Buy or order a trampoline net that’s the right size for your trampoline.
Make sure to measure the circumference of your trampoline before ordering so you get the right size.
2. Once you have your net, lay it out on the ground next to the trampoline so you can see how it will fit.
3. Start at one end of the net and attach it to the top of one of the upright poles with zip ties or by tying knots in the material.
Do this all the way around until you reach the other end of the net.
4. Repeat step 3 on the bottom row of poles so that both rows are now secured with your new netting!
10Ft Trampoline Instructions
Assemble your 10ft trampoline according to the manufacturer’s instructions. Set it up in an open, level area away from any structures or obstacles.
Inflate the jumping mat with a hand or electric pump according to the manufacturer’s instructions.
Attach the spring padding around the edge of the trampoline frame. Make sure that all hooks are securely in place.
Before allowing anyone to jump on the trampoline, test it out yourself first.
Jump in the middle of the trampoline and make sure that it feels sturdy and secure. If everything looks good, then you’re ready for some fun!
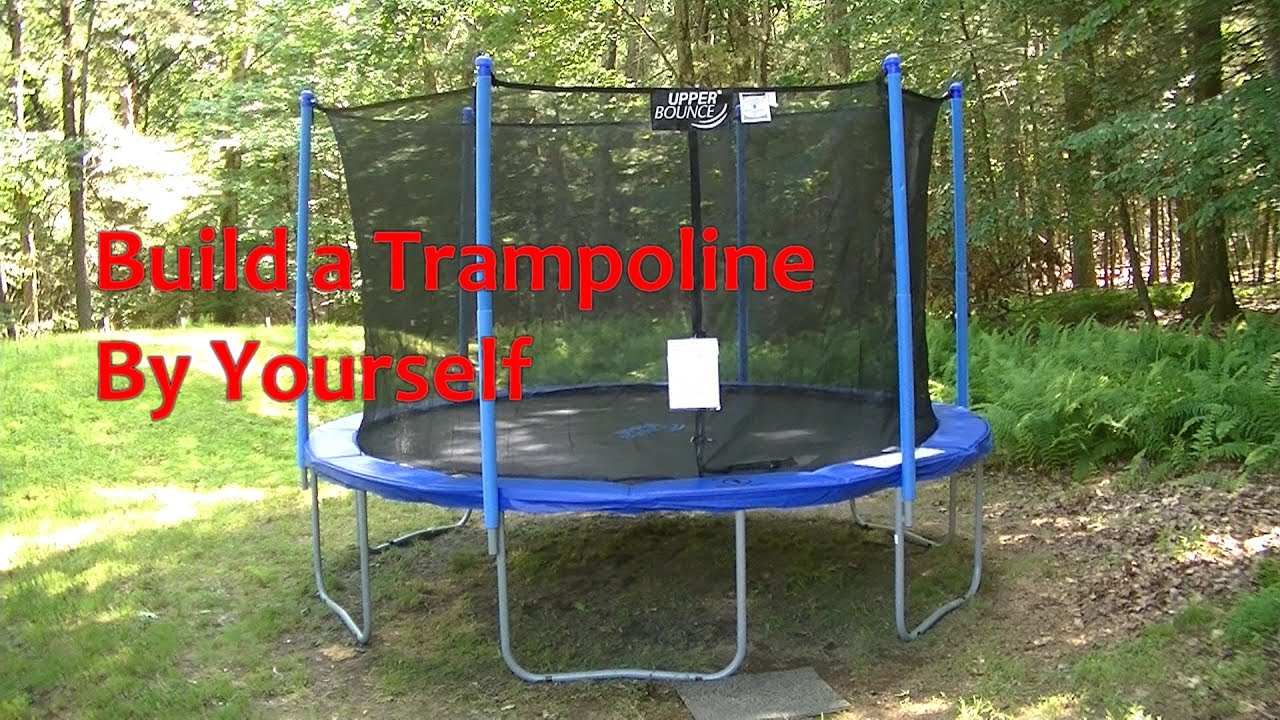
How to Put a Trampoline Together by Yourself
If you’re like most people, you probably didn’t grow up with a trampoline in your backyard. But that doesn’t mean you can’t have one now! In fact, putting a trampoline together by yourself is surprisingly easy to do.
Just follow these simple steps and you’ll have your very own trampoline set up in no time.
The first thing you need to do is gather all of the necessary materials. This includes the trampoline itself, of course, as well as any tools you’ll need to put it together.
Most trampolines come with everything you need except for a few basics like screws and bolts. Once you have everything gathered, take a look at the instructions that came with your trampoline.
Now it’s time to start putting things together!
Begin by attaching the legs to the frame of the trampoline. If your model has pre-drilled holes, this will be easy to do. If not, simply use a drill to make some holes before screwing in the legs.
Next, it’s time to stretch out the spring system around the edge of the frame. Make sure that each spring is properly attached before moving on. Once all of the springs are in place, it’s time to connect them all together with straps or hooks (depending on your model).
Finally, it’s time to test out your new trampoline! Give it a few good bounces to make sure everything is secure and then invite some friends over for some fun!
How to Put Up a Trampoline Net
Are you planning to put up a trampoline net? If so, then you’ve come to the right place! This blog post will provide detailed information on how to properly put up a trampoline net.
There are several things that you need to do in order to put up a trampoline net. First, you need to make sure that the trampoline is properly secured. This means that the legs of the trampoline should be firmly attached to the ground, and the frame should be stable.
Next, you’ll need to attach the springboard and mat. Once these two items are in place, you can begin attaching the net.
The first step in attaching the net is to thread one end of the rope through the top ring of the net.
Then, tie a knot at this end of the rope so that it is secure. Next, take the other end of the rope and thread it through one of The holes located near The bottom of The Trampoline’s frame . After doing this , tie another knot at this end Of The rope as well .
Now , take The middle Of The Rope And Thread It Through The Second Hole Near The Bottom Of The Frame . Make sure that both knots are tight before proceeding .
If everything is done correctly up until this point , then all That’s left To Do Is To Put Up The Ladder And Attach The Netting To It .
Start by putting one side OfThe ladder againstThe Frame OfThe Trampoline . Use Bolts Or Nuts ( whatever came WithYour Trampoline kit ) To AttachThe Ladder securelyToThe Frame . OnceOne Side IsDone , DoThe Same Thing OnThe Other Side As Welll
Now it’s time for attachingthe actualnettingtotheladder!GettheNettinganddrapeittovertheLadder( make surethatItiscentered)andusenyloncordorzip tiesattachedtheNettingtotheLadderrungs goingallofthewayarounduntilyoucometo whereyoustartedfrom.(Youmaywanttoleavea littlebitof slackinthenettingfor safetyreasons.)Afterthisfinalstepismade yourtrampolinenetwillbe completeandreadyforuse!.
Trampoline Assembly Instructions Pdf
Whether you’re planning on adding a trampoline to your backyard for the first time, or you’re looking to replace an old one, you’ll need to know how to properly assemble it. While most trampolines come with some form of instruction manual, they can often be confusing and difficult to follow. That’s why we’ve put together this step-by-step guide on how to assemble a trampoline, complete with a downloadable PDF!
Before you start, make sure that you have all of the necessary tools and materials. You’ll need:
– A Phillips head screwdriver
– A measuring tape or ruler
– The trampoline frame itself
– The spring system (this will usually come in a box)
– The mat (this may already be attached to the frame)
– The safety enclosure (if applicable)
Once you have everything gathered, follow these steps:
1. Lay out the trampoline frame on level ground. If possible, do this on grass or another soft surface to prevent damage to the frame.
2. Begin attaching the springs to theframe using the hooks or clamps that are provided.
Make sure that each spring is evenly tightened before moving onto the next one.
3. Once all ofthe springs are in place, stretch outthe mat over them and secure itto the frame usingthe straps or clips that are provided. Be sure not tonot over tighten these as it could damage themat.
4. Ifyou’re usinga safety enclosure, now isthe time toputit together followingthe instructionsthat came withit . Once it’s assembled , fitit aroundthe outsideofthe trampolineandattachitas directed . 5 . Giveeverythingone final checkbefore lettinganyoneuseittomakesurethat everythingissecurelyin placetoavoid anyaccidents . 6 . Andthat ‘s it ! You shouldnow havea fullyfunctionaltrampolinereadyfor use ! Justmake sureto supervisechildrenwhen they’ reusingittoensuretheirsafety atall times .
Trampoline Assembly Problems
If you’re like most people, you probably wait until the last minute to assemble your trampoline. This can often lead to problems, as you may not have enough time to do it properly. Here are some tips to help you avoid common trampoline assembly problems:
1. Make sure you have all the parts before you start. It’s easy to forget something when you’re in a rush, so take a few minutes to check that you have everything you need.
2. Follow the instructions carefully.
Skipping steps or taking shortcuts will likely lead to problems down the road.
3. Take your time. Rushing through the assembly process will only increase the chances of making a mistake.
Set aside enough time so that you can do it right the first time.
4. Get help if needed. If you’re having trouble with any part of the assembly process, don’t hesitate to ask for help from a friend or family member.
How to Put a 14Ft Trampoline Together
If you’re lucky enough to have a 14ft trampoline, you probably can’t wait to get it set up so you can start jumping! Here’s a quick guide on how to put your new trampoline together.
First, lay out all of the pieces on level ground.
Make sure that the legs are facing the correct way and that all of the holes line up. Next, take the mat and stretch it over the frame, starting at the center and working your way out. Once the mat is in place, secure it with the spring clips around the edge.
Now it’s time to add the springs. Starting at one end, hook each spring into place around the metal ring. Make sure that they’re evenly spaced out as you go along.
When you reach the other end, cut off any excess spring with wire cutters.
Last but not least, attach the safety pad around the outside of the frame. This will help protect jumpers from hitting their head on any exposed metal parts.
And that’s it – your trampoline is now ready for action!
Credit: www.gettrampoline.com
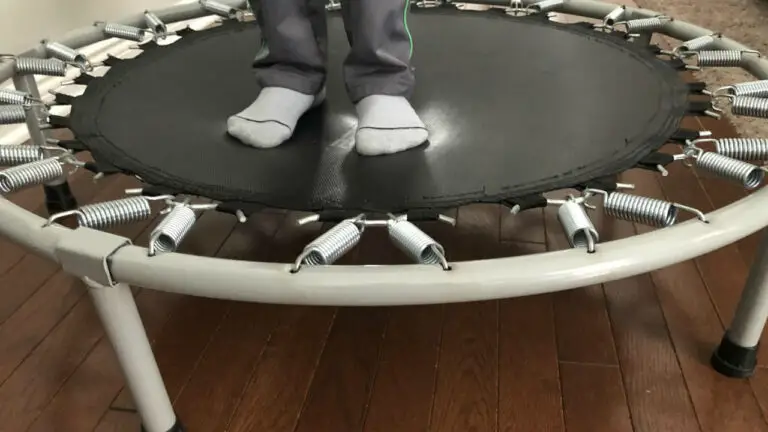
How Do You Assemble a 12 Foot Trampoline?
When you purchase a 12 foot trampoline, it will come in a box with all of the necessary parts and tools needed for assembly. The first step is to lay out all of the parts in an open area. Next, you will need to connect the frame together using the provided bolts and screws.
Once the frame is together, you can then start attaching the springs. There are usually 96 springs that need to be attached evenly around the entire trampoline. Finally, you can attach the safety padding around the outside of the trampoline.
Make sure that all of the bolts and screws are tightened properly before allowing anyone to use the trampoline.
How Long Does It Take to Put a 12 Foot Trampoline Together?
It takes about an hour to put a 12 foot trampoline together. This includes setting up the frame, attaching the springs, and putting on the mat. If you have never assembled a trampoline before, it is recommended that you have two people working together.
What Order Do You Put the Springs on a Trampoline?
If you’re putting together a new trampoline or replacing the springs on an old one, it’s important to do it correctly. The order of the springs matters, and if you put them on in the wrong order, the trampoline won’t work properly.
Here’s how to put the springs on a trampoline, in the correct order:
1. Start by attaching one end of the first spring to the outside frame of the trampoline. Make sure that the coils of the spring are facing outwards.
2. Hook the other end of that same spring onto one of the legs of the trampoline’s jumping mat.
Again, make sure that the coils are facing outwards.
3. Repeat those same steps for each additional spring, attaching them all around the outside frame and hooking them onto legs of the jumping mat.
4. Once all of the springs are in place, check to make sure that they’re all tight and secure before letting anyone use the trampoline.
What Age is a 12 Foot Trampoline For?
A 12 foot trampoline is for ages 6 and up. It has a weight limit of 250 pounds and can accommodate up to 4 people at once.
Conclusion
This blog post provides a step-by-step guide for setting up a 12 foot trampoline. The first step is to lay out the legs of the trampoline in an even circle. Next, stretch the mat over the frame of the trampoline and secure it with straps.
Finally, attach the safety netting around the perimeter of the trampoline. With these simple steps, you’ll have your 12 foot trampoline set up in no time!