There are many ways to set up the springs on a Sportspower trampoline. One way is to use the spring hook, which is located on the top of the trampoline frame. Another way is to use the spring clip, which is located at the bottom of the trampoline frame.
The third way is to use the spring pin, which is located in the middle of the trampoline frame.
There are many trampolines on the market, but the Sportspower trampoline is a great option for those looking for a quality product. This trampoline has 72 springs that provide plenty of bounce and support. The process of setting up the springs can be a bit daunting, but following these simple steps will make it much easier.
1. Gather all of the materials you will need before beginning. This includes the trampoline, spring tool, and pliers.
2. Begin by attaching one end of the first spring to the outermost hole on the frame using the spring tool.
Make sure that the hooks are facing inwards so that they can grip onto the frame properly.
3. Take the other end of the spring and hook it onto one of the legs of the trampoline. You may need to use pliers to get a tight fit.
Be sure that this connection is also secure before moving on.
Sportspower Trampoline – Building Instructions
Sportspower 14 Trampoline Assembly Instructions
If you’re looking for assembly instructions for the Sportspower 14′ Trampoline, you’ve come to the right place! This blog post will provide detailed information on how to put this trampoline together so that you can enjoy hours of fun and exercise.
The first thing you’ll need to do is gather all of the necessary parts and tools.
You’ll need the following:
– The trampoline frame
– The spring pad
– The safety netting
– The jumper mat
– 96 springs (48 for the 8ft model)
– A ladder or step stool
– A drill
– 1/2″ socket wrench with an extension
With all of your materials gathered, it’s time to begin assembly! Start by attaching the legs to the trampoline frame using the supplied bolts and washers. Next, stretch out the spring pad over the frame and stapled it into place along the edge.
Be sure to leave about 2 inches of extra material around all sides so that it can be tucked under later. Now it’s time to attach the springs. Starting at any corner, hook one end of a spring onto the hole in the frame then stretch it across to connect it to another hole diagonally opposite.
Repeat this process until all 96 springs are in place (48 for 8ft model). Once all of your springs are hooked in, give them a good bounce test before proceeding.
Sportspower 12Ft Trampoline Assembly Instructions
Are you looking for a great way to have some fun and get some exercise at the same time? If so, then you should consider getting a trampoline. A trampoline is a great addition to any backyard, and it can provide hours of fun for all ages.
But before you can start jumping on your new trampoline, you need to assemble it. Don’t worry – assembling a Sportspower 12ft Trampoline is easy! Just follow these simple instructions and you’ll have it set up in no time.
1. Start by attaching the legs to the frame of the trampoline using the bolts that are provided. Be sure to tighten the bolts securely so that the legs are firmly attached.
2. Next, stretch out the mat over the frame of the trampoline and secure it in place with the spring clips.
Again, be sure to clip them on tightly so that everything stays in place while you’re jumping around.
3. Now all that’s left to do is hook up the safety netting around the perimeter of the trampoline. Once everything is hooked up properly, your Sportspower 12ft Trampoline will be ready for use!
Sportspower Trampoline 168
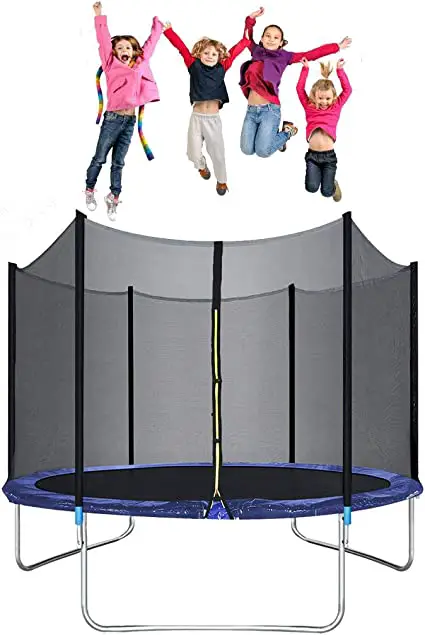
If you’re looking for a great trampoline to add to your backyard, the Sportspower Trampoline 168 is a great option! This trampoline features a sturdy metal frame and 96 springs that provide plenty of bounce. The mat is made of UV-resistant material, so it will withstand sun exposure without fading.
The included safety enclosure ensures that jumpers stay safe while they play. Assembly is required, but all necessary tools are included.
Sportspower Trampoline Parts
If you’re in need of Sportspower trampoline parts, you’ve come to the right place. Here at TrampolinePartsandSupply.com, we carry a wide selection of parts for Sportspower trampolines, so you can easily find what you need to get your trampoline up and running again.
Whether you’re looking for a new mat, spring, frame pad, or any other part, we have it in stock and ready to ship out to you.
We also offer a variety of replacement parts for Sportspower safety enclosures, so you can keep your family safe while they’re enjoying their time on the trampoline.
We know how important it is to have a fully functioning trampoline, so we work hard to get your order shipped out as quickly as possible. In most cases, orders placed before 2:00 pm EST will ship out the same day.
And if you need help finding the right part for your Sportspower trampoline, our customer service team is always happy to assist.
So don’t wait any longer – order the Sportspower trampoline parts you need from us today!
Bouncepro Sportspower 14Ft Trampoline
The Bouncepro Sportspower 14Ft Trampoline is a great trampoline for kids and adults alike. It’s made with heavy-duty steel construction and can hold up to 250 lbs. The trampoline also comes with a safety net enclosure that will keep everyone safe while they’re bouncing around.
Bounce Pro Sportspower Trampoline Instructions
Assuming you would like instructions on how to set up the Bounce Pro Sportspower Trampoline:
Setting Up Your New Trampoline
The first thing you will need to do is find a level spot in your yard for the trampoline.
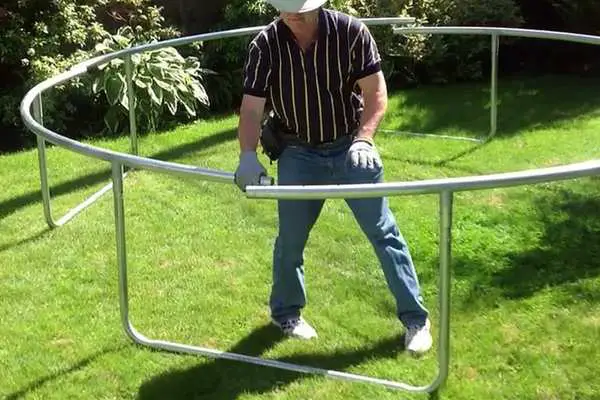
It is important that the ground is level because it helps to keep the trampoline stable and secure. Once you have found a good location, lay out the frame pieces on the ground in their proper order.
Next, start connecting the frame together using the provided bolts and nuts.
Make sure that each connection is tight so that the frame is sturdy. Once all of the frame pieces are connected, it’s time to connect the legs. There are 4 legs on this trampoline and they should be evenly spaced around the perimeter of the trampoline.
After connecting all 4 legs, stand up the trampolineframe and make sure that it is steady before proceeding. Now it’s time to connectthe safety padtothe frame. The safety pad goes overthe entire circumference ofthe trampolineand coversall ofthe springsand metal frameworkso that users don’t get injured while jumping.
Use zip ties toproperlysecurethe safetypadtotheframein several placesaroundthetrampoline. Make surethat thesezip tiesare verytightbecause theyhelpkeep everyone safe while using your newtrampoline!
Now it’s timefor themostexcitingpart – addingtheyellowjumppad!
This part can be a little tricky so we recommend having two people help withthis step. Unfoldtheyellow fabricand drapeitoverthetopofthetrampolineframe making surethatitis evenonall sidesbeforesecuringwith morezip tiesatseveral differentplacesaroundthe edgeofthetrampolineto holditin place securelywhileyou finishstretchingoutthematerialovertherameworkofthetrAMPOLINE . Doingthisstepwith anotherpersonwillmakeithardertoaccidentallylet goofthematerialwhileyouare workingwhich couldresultinyouhavingtostartoverfrom scratch!
Sportspower 14Ft Trampoline Net
If you’re looking for a trampoline that will provide your family with hours of fun and exercise, the Sportspower 14Ft Trampoline Net is a great option. This trampoline features a durable steel frame and a heavy-duty polypropylene jumping mat, making it built to last. The included safety enclosure ensures that jumpers are safe while they play, and the spring-loaded legs make setup quick and easy.
With a weight capacity of 250 lbs., this trampoline is perfect for kids and adults alike.
Sportspower 14Ft Trampoline Parts
Are you in need of Sportspower 14Ft Trampoline Parts? Here at TrampolinePartsandSupply.com, we’ve got you covered! We carry a large selection of replacement parts for your Sportspower 14ft trampoline, including mats, pads, nets, enclosures, springs, and more.
If you need help finding the right part for your trampoline, our customer service team is always happy to assist. Give us a call or send us an email today and we’ll be glad to help you get your trampoline up and running again in no time!

Credit: www.sportspowertrampolineparts.com
How Do You Assemble a Trampoline Spring?
Assuming you have all the necessary parts, tools and safety equipment, assembling a trampoline spring is not overly complicated. However, it is important to take your time and follow the instructions carefully to avoid injury or damage to the equipment. With that in mind, here is a basic overview of how to assemble a trampoline spring:
1. Start by spreading out the mat on a level surface. If possible, do this in an area with soft grass or sand so that if you happen to fall while working on the trampoline, you won’t get hurt.
2. Next, take a look at the frame to identify where the springs will be attached.
There should be circular holes around the edge of the frame where the springs fit into.
3. Now it’s time to start attaching the springs! Take one end of a spring and hook it onto the hole in the frame.
Then stretch the spring out so that the other end can be hooked into another hole further down on the frame. Continue until all of the springs are attached (you may need help from another person to do this).
4. Once all of springs are in place, give them a little bounce test just to make sure they’re all secure before moving onto step 5.
5., Now it’s time to put onthe safety padding which will go aroundthe edgeoftheframeandovertheSprings topreventanyonefromgettinghurtiftheyfalloffofthetrampolinewhilebouncing.. 6., Make suretofollowthespecificationsprovidedbythemaufacturerregardingwhichtypeofpaddingtouseandhowmuchtoputon.
. 7., Onceyouhaveallofthepaddinginplace,youcanmoveontothenextstep..
How Do You Set Up a Trampoline Step by Step?
Assuming you would like a blog post on how to set up a trampoline:
Most people don’t realize how easy it is to set up their own trampoline. With a few simple steps, you can have your trampoline ready to go in no time!
Here’s how to do it:
1. Choose a level spot in your yard for the trampoline. Avoid any area with uneven ground or slopes.
2. Spread out the mat of the trampoline on the ground and make sure all hooks are facing up.
3. Assemble the frame of the trampoline according to the instructions. Make sure all connections are snug and tight.
4. Hook the mat onto the frame, using all springs if possible (some frames come with fewer springs). Again, make sure everything is tight and secure.
5. Stand back and enjoy your new trampoline!
How Do You Put a Trampoline Back Together?
Assuming you have all the necessary parts, tools and instructions, here is a basic rundown of how to put a trampoline together:
1. Lay out the frame on level ground and assemble the legs. Make sure that the legs are locked into place before proceeding.
2. Affix the spring pad to the frame using U-bolts, making sure that it is centered and evenly distributed.
3. Install the springs onto the spring pad, again ensuring that they are even in number and tension. You may need a second person to help with this step.
4. Spread out the mat over the frame and attach it to the springs using V-rings or zip ties. Be careful not to stretch or damage the mat while doing so.
5. Finally, test your work by bouncing lightly on the trampoline surface to make sure everything is secure and there are no gaps where you could potentially fall through.
How Do You Assemble a 14 Foot Trampoline?
Assuming you would like a blog post discussing how to assemble a 14 foot trampoline, here is one possible outline:
-14 foot trampolines are a great size for both kids and adults. They provide plenty of room to jump and play without taking up too much space in your yard.
-Assembling a 14 foot trampoline is not difficult, but there are a few things to keep in mind.
-First, make sure you have all the necessary parts. The trampoline should come with legs, springs, mat, padding, and hardware.
-Next, lay out the legs and connect them together with the springs. Then attach the mat to the frame using the hooks or straps that came with it.
-Finally, put on the padding around the edge of the mat.
This will help protect jumpers from getting hurt if they fall off.
-Now your 14 foot trampoline is assembled and ready for use!
Conclusion
If you’ve got a Sportspower trampoline, you might be wondering how to set up the springs. It’s actually not difficult – all you need is a little patience and some basic tools. Here’s a step-by-step guide to help you get started.
First, gather together the following supplies:
– A spring puller tool (this can be purchased at most hardware stores)
– A Phillips head screwdriver
– Pliers
– A friend (optional, but helpful!)
Now, follow these steps:
1. Using the spring puller tool, remove any old or damaged springs from the trampoline frame. Be careful not to lose any of the small parts! If you’re having trouble removing a spring, try using pliers to grip it before pulling.
2. Once all of the old springs are out, take a look at the holes where they were attached. If any of them are damaged or stretched out, use your Phillips head screwdriver to enlarge them slightly so that the new springs will fit snugly.
3. Now it’s time to put in the new springs – but before you do, make sure they are all facing in the same direction (the coils should be facing towards the center of the trampoline).
To attach a spring, first hook one end onto the hole on the frame, then stretch it out and hook the other end onto another hole further down on the frame. Repeat this process until all of your new springs are in place – again being careful not to lose any small parts!
4. Once all of your new springs are hooked into place, give them a few good tugs just to make sure they’re secure before letting anyone use the trampoline again.
And that’s it – you’re done!