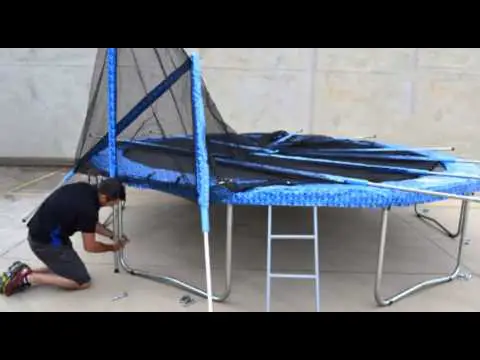
Assuming you have all the parts to your trampoline, here are the steps to take to assemble the net. The first thing you need to do is find a level spot in your yard to set up your trampoline. Once you have found the perfect spot, lay out all of the parts in their appropriate places.
Starting with the frame, begin attaching each pole one by one until they are all securely in place. Next, take the safety pad and stretch it over the frame, making sure that it is tight and not saggy anywhere. Now comes time for the fun part-the jumping!
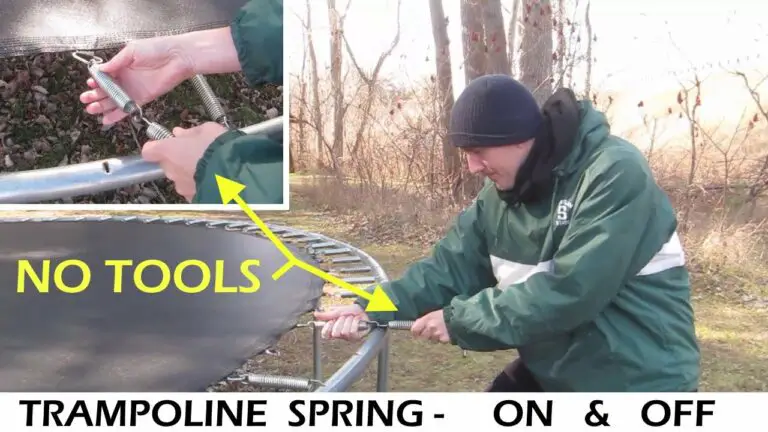
Put on the spring cover (if you have one) and start attaching springs around the edge of the frame. Make sure that each spring is hooked onto both the frame and its neighboring spring before moving on. Finally, attach your trampoline mat by looping it over each spring and pulling it tight so there are no wrinkles.
And now you’re ready to jump!
- Unfold the trampoline and place it in an open, level area
- Attach the legs to the trampoline frame using the provided bolts and wrench
- Spread the net out over the trampoline frame, making sure that it is evenly distributed
- Use the provided zip ties to secure the net to the frame at several points around the perimeter
- Test the trampoline net by bouncing on it lightly to make sure that it is secure before allowing anyone to use it unsupervised
How To Assemble A Upper Bounce Trampoline & Safety Net Enclosure, Springs ETC. Step By Step Guide!
Zoomster Trampoline Net Instructions
Assuming you would like a blog post on how to put together a Zoomster trampoline:
“Zoomster Trampoline Net Instructions”
Putting together a Zoomster trampoline is easy and only takes a few minutes.
Here are the instructions:
1. Start by attaching the four legs to the base of the trampoline. Make sure that the legs are evenly spaced out.
2. Once the legs are attached, add the protective padding around the edge of the trampoline.
3. Next, attach the safety netting to the frame of the trampoline using zip ties or similar fasteners.
4. Finally, add any additional accessories such as ladders or basketball hoops (these are sold separately).
That’s it! Your Zoomster trampoline is now ready for use. Enjoy!
Sportspower Trampoline Net Instructions
If you’re looking for instructions on how to install a Sportspower trampoline net, you’ve come to the right place. In this post, we’ll walk you through the entire process step-by-step so that you can get your trampoline up and running as quickly and easily as possible.
Before we begin, there are a few things you’ll need to gather:
– The trampoline frame
– The trampoline mat
– The trampoline springs (if not already attached to the frame)
– The trampoline netting
– A ladder or stool (to help with installation)
With everything gathered, let’s get started!
1. First, take the time to lay out all of the parts in front of you so that you have a good idea of what goes where. This will make the assembly process much simpler.
2. Next, attach the springs to theframe usingthe hooks provided.
Make sure that each spring is securely in place before moving on to the next one.
3. Once all of the springs are in place, it’s time to add themattress onto the frame. Start by attaching one corner and then work your way around until it is fully secure.
4. Now it’s time for thenetting . Begin by placingthe netting overthe top ofthe frame and tucking it underneaththe mattress on each side. Then, stretchit outwards until it is taunt and secureit toeach hookon theframe .
Make surethat thereis no slackin thenetting ,as this couldcreate a safety hazard during use .
5That’s it! You’ve now successfully installed your Sportspowertrampoline . All that’s leftto do is giveit a test bounceor twobefore lettinganyone elseuse it . Enjoy !
How to Put a Net on a 14Ft Trampoline
If you have a 14ft trampoline, you might be wondering how to put a net on it. Here’s a step-by-step guide:
1. First, make sure that your trampoline is properly assembled and all of the legs are locked in place.
2. Next, take the netting and stretch it out over the top of the trampoline frame.
3. Once the netting is in place, use zip ties or laces to secure it to the frame. Make sure that the netting is tight so that there are no gaps.
4. Finally, check all of the connections to make sure that they are secure before allowing anyone to use the trampoline.
Trampoline Setup Instructions
When you think of a trampoline, you might imagine a bouncy, fun activity for kids. But did you know that setting up a trampoline can be quite tricky? If you’re not careful, you could end up with an unsafe setup that could cause accidents.
Here are some tips to help you set up your trampoline safely:
1. Read the instructions carefully before beginning. This will help you understand the process and identify any potential hazards.
2. Make sure the area where you’ll be setting up the trampoline is level and free from debris. The last thing you want is for your trampoline to tipping over or collapsing while in use.
3. Assemble the frame according to the instructions.
Be sure to tighten all screws and bolts securely.
4. Once the frame is assembled, stretch out the mat over it and secure it in place with the spring clips around the edge. Again, make sure everything is tight and secure before moving on.
5. Now it’s time to attach the springs! Starting at one corner, hook each spring onto the corresponding hole on the frame until all springs are in place. Then stretch them out evenly around the perimeter of the mat so they’re taut but not overly stretched out (this can cause damage).
Finally, use pliers to twist each spring’s hooks closed so they stay in place – do not skip this step!
Trampoline Assembly Instructions Pdf
Are you looking for trampoline assembly instructions? Don’t worry, we’ve got you covered!
In this blog post, we will provide detailed instructions on how to assemble your trampoline.
We will also include a PDF of the instructions so that you can follow along easily.
We hope that after reading this blog post, you will feel confident in assembling your trampoline. Let’s get started!
Trampoline Net Inside Or Outside
There are many factors to consider when deciding whether to place a trampoline net inside or outside. Here are some things to keep in mind:
-Trampolines can be used year-round if they are placed indoors.
However, they will only be usable during certain months if they are placed outdoors.
-Indoor trampolines take up less space than outdoor ones. This is because the netting and frame can be collapsed when not in use.
Outdoor trampolines must be left assembled at all times.
-Outdoor trampolines may be subject to weather damage, such as rusting from rain or snow. Indoor trampolines will not be affected by the elements.
ultimately, the decision of whether to place a trampoline net inside or outside depends on personal preference and situation.
How to Install Upper Bounce Trampoline Net
Installing an Upper Bounce Trampoline Net is a great way to keep your kids safe while they’re playing on the trampoline. Here are some simple instructions on how to do it:
1. First, you’ll need to purchase an Upper Bounce Trampoline Net.
You can find these online or at most sporting goods stores.
2. Once you have the net, lay it out on the ground next to the trampoline.
3. To attach the net to the trampoline, you’ll need to use zip ties or hooks (depending on which type of net you purchased).
Start by attaching one end of the netting to the top of the trampoline frame.
4. Work your way around the entire perimeter of the trampoline, attaching the net as you go. Make sure that the net is taut and secure before moving on to step 5.
5. The final step is to test out the new Upper Bounce Trampoline Net! Have someone stand inside of it while another person bounces on different parts of the trampoline. If everything looks good, then you’re all set!

Credit: www.wikihow.com
How Do You Put a Trampoline Net Together?
If you’ve got a trampoline with no net, it can be pretty dangerous. Even if you’re the most careful jumper in the world, accidents can happen, and when they do, there’s nothing to stop you from flying off the trampoline and into who-knows-what. That’s why it’s important to have a net around your trampoline – to keep you safe while you’re jumping.
But how do you put a trampoline net together?
Thankfully, it’s not too difficult. Most trampoline nets come in sections that are easy to assemble.
Simply follow the instructions that come with your particular model of net, and you should have no trouble getting it set up.
In general, though, here’s what you’ll need to do: first, attach the top part of the netting to the ring at the very top of the trampoline frame. Make sure that this connection is secure – if it isn’t, your net could easily come detached while you’re jumping and leave you vulnerable.
Next, stretch the netting down over the rest of the frame until it reaches all the way to the ground. Again, make sure that each section is tightly secured so that there are no gaps for jumpers to slip through.
Finally, once everything is in place, give the entire setup a good shake or two just to make sure that everything is nice and tight before letting anyone jump on it.
And that’s all there is to it! With a few simple steps, you can have a safe and fun trampoline for everyone to enjoy.
How Do You Remove the Net from a Trampoline?
If you need to remove the net from your trampoline, there are a few things you’ll need to do. First, you’ll need to take off the padding that surrounds the outside of the trampoline. This is usually done by undoing the Velcro straps that hold it in place.
Once the padding is removed, you can then start taking off the netting. The netting is usually attached to the frame of the trampoline with hooks or laces. You’ll need to undo these in order to remove the netting.
Once the netting is removed, you can then put away all of the parts until you’re ready to use them again.
How Do You Set Up a 14Ft Trampoline Net?
Assuming you have already purchased your 14ft trampoline and it is ready to be set up, here are the steps you need to follow in order to properly install the net.
1) First, lay out the trampoline on level ground and make sure that all legs are equally extended. If they are not, adjusting them until they are.
2) Next, take the enclosure netting and start at one of the bottom corners of the trampoline frame. Attach the netted band around the entire circumference of the frame using zip ties or similar fasteners.
3) Once you have gone all the way around once, go back and do a second layer just above the first one for added protection against wear and tear.
4) After securing two layers of netting around the frame, it is time to attach the upper most part of netting which will serve as an entrance/exit point for users. You can do this by threading a rope through one of top loops on either side and then pulling it tight so that there is no slack before tying it off.
5) Lastly, test everything out by giving gentle bounces in various places around perimeter of trampoline to check that there is no give or movement in any part of structure – if there is, make necessary adjustments until everything feels secure.
How Do You Put a Net on a 12 Foot Trampoline?
Assuming you would like tips on how to put a net on a 12 foot trampoline:
First, you’ll want to purchase a net that is specifically designed for 12 foot trampolines. You can find these nets at most sporting goods stores or online.
Once you have your net, follow these instructions:
1. Begin by stretching the net out over the top of the trampoline. Make sure that the edges of the net are even with the edges of the trampoline frame.
2. Next, take one end of the net and attach it to the top of the trampoline frame using bungee cords or zip ties. Repeat this step with the other end of the net.
3. Once both ends of the net are securely attached to the frame, stretch it down along the sides of the trampoline and secure it in place using more bungee cords or zip ties.
Be sure to leave some slack in the net so that it can move slightly as people jump on and off the trampoline.
4. Finally, test out your new setup by jumping around onthe trampoline and making sure that everyone stays safely insidethe netted area!
Conclusion
Assuming you would like a summary of the blog post entitled “How to Assemble a Trampoline Net”:
The post begins by outlining the necessary tools and materials, which include a measuring tape, scissors, and an Allen wrench. It is important to measure the trampoline frame before cutting the netting to ensure proper fit.
The author then provides step-by-step instructions for attaching the netting to the trampoline frame, beginning with threading one end of the net through a gap in the frame. Once both ends of the net are in place, it is time to start tightening it using the Allen wrench. The final step is to test out the trampoline net by bouncing on it to make sure it is secure.