Creating a trampoline in Roblox Studio is easy and only requires a few simple steps. First, create a square or rectangular platform using the Block tool. Make sure the platform is big enough for your avatar to jump on comfortably.
Next, create a Cylinder under the platform using the Cylinder tool. The Cylinder will act as the trampoline’s “spring.” Finally, select both the platform and the Cylinder and click on the Joints tab.
In the Joints tab, choose “Weld” from the drop-down menu and click “Create.” Your trampoline is now ready to use!
- Open Roblox Studio and create a new place
- Click on the Insert tab, then click on Trampoline in the Models section
- Place the trampoline in your game environment
- Test it out by clicking on the Play button! Your character should be able to jump on the trampoline and bounce high into the air
How to make a TRAMPOLINE | Roblox Studio
How to Make a Trampoline in Roblox Studio 2022
In this post, we’ll show you how to make a trampoline in Roblox Studio 2022. This is a great way to add some fun and excitement to your game, and it’s also a great way to learn about the Roblox Studio interface. So let’s get started!
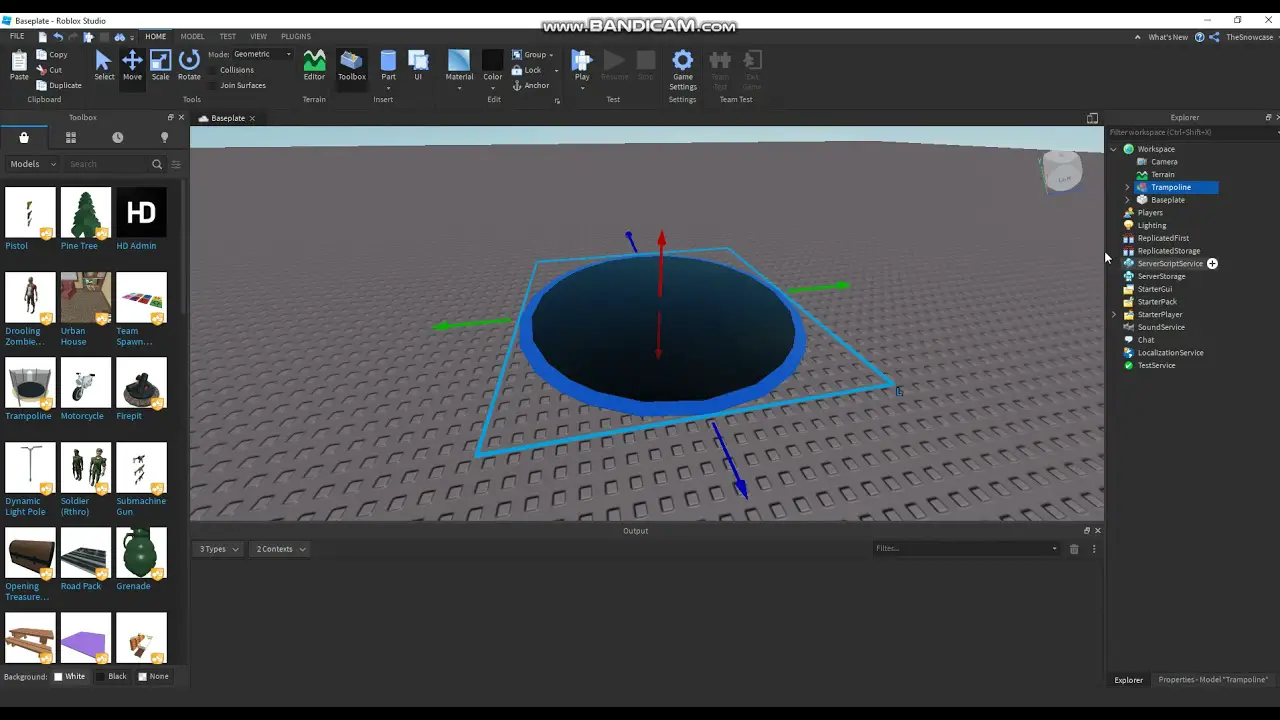
The first thing you’ll need to do is open up Roblox Studio and create a new project. Once you have your project open, go ahead and click on the “Models” tab. In the Models tab, find the “Trampoline” model and double-click it to add it to your workspace.
Now that you have your Trampoline model added to the workspace, it’s time to start customizing it. The first thing you’ll want to do is change the size of the trampoline. To do this, select the trampoline model in the workspace and then click on the “Size” tab in the Properties window.
Change the Width property to 10 and then change the Height property to 5.
Next, you’ll want to change the color of the trampoline mat. To do this, select the trampoline model in the workspace and then click on the “Material” tab in the Properties window.
In the Material dropdown menu, select “Color.” Then use the color picker tool to choose a new color for your trampoline mat. We went with blue for our example trampoline!
Now that you’ve customized your trampolinemodel, it’s time to test it out in game! Go ahead and click on th e “Play” button at t he top of Roblox Studio . When y ou’re i n g ame , walk u p t o y our t rampolinemodel an d p ress th e spacebar key t o j um p o n i t .
You should see your character bounce high into t he air ! I f not , go back int o R oblo x S tu dio an d check y our s etting s . Onc eyou’r e satisfied with h owyourt r ampolinew orks , yo u can publishy ourg ame fo r ot hersto enj oy !
Roblox Trampoline Park
Roblox Trampoline Park is a popular destination for families and friends looking to have some fun. The park offers a variety of trampolines, including freestyle areas, dodgeball courts, and basketball hoops. There is also a cafe on site serving refreshments.
The park is open daily from 10am to 10pm. Admission is $20 per person for two hours of jumping time.
How to Make a Trampoline in Roblox Studio 2021
Making a trampoline in Roblox Studio 2021 is easy! First, create a part and name it “Trampoline”. Then, set the Part’s Anchored property to true so it doesn’t move around.
Next, go into the Trusses tab and select “New Truss”. Name the truss “TrampolinePlate” and parent it to the Trampoline part. Change the Material to “SmoothPlastic” and adjust the Size properties so that the plate is big enough to stand on.
Now we need to add a script that will make the trampoline work! First, create a new Script and open it up in your text editor. We want this script to run when the player lands on the trampoline, so we’ll use the Touched event handler:
function onTouched(hit) — we only want this to trigger if the player hits –the trampoline from below if hit.Position.Y < hit.ParentPart.Position.Y then local character = hit.Parent -- get a reference to the character who touched us local velocity = character:GetVelocity() -- get their current velocity velocity = velocity + Vector3 .new( 0 , 200 , 0 ) -- add an upward force character:SetVelocity(velocity) -- apply the new velocity end end TrampolinePlate .Touched:Connect(onTouched)
Save your script and test it out! When you jump onto your trampoline, you should be sent flying upwards!
Roblox Velocity
Roblox Velocity is a feature that allows users to control the speed of their avatar. It was introduced in 2017 and has been a popular addition to the game ever since. There are three different levels of velocity, each with its own distinct benefits.
Level one allows users to move at twice the normal speed, level two at three times the normal speed, and level three at four times the normal speed. The higher the level, the more difficult it is to control your avatar’s movements.
Benefits of using velocity include being able to move around the map more quickly, escape from dangerous situations, and reach objectives faster.
It can also be used for creative purposes, such as making movies or recording gameplay footage.Velocity can be turned on and off at any time by pressing the “V” key on your keyboard. When it is turned on, you will see a blue indicator in the top-left corner of your screen. Keep in mind that velocity uses up energy, so you’ll need to take breaks periodically or else your avatar will start moving slower than usual until it has a chance to rest.
Whether you’re trying to make a quick getaway or just want to explore your favorite map in record time, velocity is a great tool to have in your arsenal!
Roblox Transactions
Roblox transactions are a way for users to buy and sell items on the Roblox platform. Transactions can be made using real money, or through the use of Robux, the virtual currency used on Roblox.
When a user makes a transaction, they will first need to select an item that they would like to buy or sell.
Once an item has been selected, the user will need to enter their payment information. For transactions made with real money, this will include entering their credit or debit card information. For transactions made with Robux, the user will need to have enough Robux in their account to cover the cost of the item.
Once payment has been processed, the item will be delivered to the buyer instantly. Sellers will also receive their funds immediately after a sale is made. All transactions are final and cannot be reversed once completed.
Roblox transactions are a quick and easy way for users to get the items they want on the platform. By using either real money or Robux, users can buy and sell items without having to worry about waiting for someone to trade with them. Transactions are also safe and secure, as all payments are processed through either PayPal or Stripe – two of the most trusted online payment processors in existence today.
Roblox Studio
Roblox Studio is a powerful tool that allows you to create and publish your own games on the Roblox platform. With Studio, you can build just about anything imaginable, from simple objects and environments to complex game mechanics and interactions.
Whether you’re a experienced game developer or just getting started, Roblox Studio has everything you need to bring your vision to life.
In this post, we’ll give you an overview of some of the most important features in Studio so you can get started creating your own awesome games!
The first thing you’ll need to do when opening up Roblox Studio is select a place to edit. You can either create a new place from scratch, or open up an existing place that someone else has made public.
For this example, we’ll be starting with a blank canvas.
Once you have your place open in Studio, take some time to familiarize yourself with the interface. The left sidebar contains all of the different types of objects that you can place in your game, while the right sidebar provides options for customizing those objects.
In the center of the screen is where you will actually build out your game environment.
One of the most important things to understand about building in Roblox Studio is how to use joints . Joints allow you to connect two objects together in a certain way so they move and interact as one unit.
This is essential for creating things like doors that swing open or pulleys that lift heavy objects. Without joints, your objects would just float independently in space!
To learn more about using joints (and other advanced features), be sure check out our other blog posts or explore the help documentation built into Roblox Studio.
Happy building!
How to Make a Game in Roblox
Roblox is a user-generated online gaming platform where players can create their own games and play them with other users. It’s a great way to get creative and have some fun with friends (or make new ones!). If you’re interested in making your own game on Roblox, here’s a step-by-step guide:
1. Decide on the type of game you want to make. There are many different genres of games on Roblox, so think about what kind you’d like to create. Do you want it to be fast-paced or slow?
Competitive or cooperative? Story-driven or sandbox? Once you have an idea of the overall feel of your game, move on to step two.
2. Choose a theme or setting for your game. This will help give your game some structure and direction. Are you making a medieval adventure?
A space odyssey? Once you know the general time period and location, start thinking about specific details like characters, weapons, environments, etc.
3. Start building!
Roblox has its own built-in editor that lets you create objects and place them in 3D space. You can also use programming code to add functionality to your game (but this isn’t required). Take some time to experiment with the editor and get familiar with its capabilities before moving on too far in development.
4. Test out your game! Ask some friends to try it out and give feedback. What do they like? What do they not like? What bugs did they find? Use this feedback to improve upon your initial design until you have something that people enjoy playing.
5. Release your game to the public! Once you’re happy with how it turned out, go ahead and publish it for everyone else on Roblox to play. Sit back and watch as people discover and enjoy everything that YOU created!
How to Get Roblox
Most people think that you need to have a Roblox account in order to get Roblox. However, this is not the case! You can actually get Roblox without even having an account.
Here’s how:
1. Go to the Roblox website and scroll down to the bottom of the page.
2. Under the “Roblox” heading, click on the “Downloads” link.
3. On the Downloads page, scroll down until you see the “Roblox Player” section.
4. Underneath the “Roblox Player” heading, click on either the Windows or Mac icon depending on what kind of computer you have. 5. The file will begin downloading automatically.
Once it has finished downloading, run it and follow the installation instructions.
6. Once you have installed Roblox, launch it and select “Create New Account” when prompted.

Credit: www.nytimes.com
How Do You Build a Trampoline in Roblox Studio?
Building a trampoline in Roblox Studio is a relatively simple process that can be accomplished by following a few basic steps. First, create a new part in your workspace and name it “Trampoline”. Next, select the part and click on the “Physics” tab in the Properties window.
Under the “Collisions” section, check the box next to “Enable collisions” and then click on the “OK” button.
Now that your Trampoline part has collisions enabled, you need to add a script to make it bounce. Create a new Script and open it in your preferred text editor.
Paste the following code into your script:
local Trampoline = script.Parent function onTouched(part) if part:IsA(“BasePart”) then — The touched part is not our Trampoline local character = part.Parent if character:IsA(“Model”) then — The touched object is not a character local human = character:FindFirstChildOfClass(“Humanoid”) if human then — We found a humanoid! Apply vertical velocity to make them jump human:ChangeState(Enum.HumanoidStateType.Jumping) end end end end Trampoline.Touched:Connect(onTouched)
Save your script and go back to Roblox Studio. In the Explorer window, select your newly created Script and drag it onto your Trampoline part. This will cause the Script to run whenever someone collides with your Trampoline part – causing them to jump into the air!
Test out your creation by clicking on the “Test Play” button at the top of Roblox Studio ( or by pressing F5 on your keyboard). When prompted, enter any Username and Password – this will create an empty place for you to test out your game without having to publish it first. Have fun!
How Do You Make a Jump Pad in Roblox Studio?
If you’re new to Roblox Studio, you might be wondering how to create a jump pad. Here’s a quick tutorial on how to do just that:
1. First, create a square platform using the Block tool.
This will be your jump pad.
2. Next, select the Platform tool and click on your square platform. In the properties window that appears, change the Material to Trampoline.
3. Now go into play mode and test out your jump pad! Have fun!
Can You Jump on Roblox?
Yes, you can jump on Roblox. To do so, simply press the spacebar while playing a game. You’ll then see your character jump up into the air.
How Do I Change My Velocity on Roblox?
There are a few different ways that you can change your velocity on Roblox. The first way is to use the built in function setVelocity(). This function takes two arguments, the first being the x component of your velocity and the second being the y component.
You can use this function to set your velocity to anything you want, including zero.
The second way to change your velocity is by using forces. Forces are what cause objects to accelerate, and you can apply them yourself using the ApplyForce() function.
This function takes three arguments: The first is the force vector (the direction and magnitude of the force), the second is the point at which to apply that force, and third is an optional parameter for how long that force should be applied. If you omit this last parameter, then the force will be applied for one frame only.
You can also use impulses to change your velocity.
Impulses are like forces, but they’re applied instantaneously instead of over time. They’re often used for things like collisions, because they simulate what would happen if two objects hit each other with a lot of force all at once. To apply an impulse, use the ApplyImpulse() function.
It works just like ApplyForce(), but with an additional argument for how much mass should be affected by that impulse (the default value is 1).
Conclusion
In Roblox Studio, you can create a trampoline by following these steps:
1. Create a new part in your workspace and name it “Trampoline.”
2. Set the Part’s Material to “SmoothPlastic” and its color to green.
3. Next, go to the Physics tab and check the “Collides” box. This will make sure that players will be able to bounce off of your trampoline when they collide with it.
4. Finally, add some surface tension by increasing the Part’s Friction value under the Constraints section.
This will make it so players won’t slip off of your trampoline when they land on it.