If you have a trampoline that needs to be disassembled, it’s not as difficult as it may seem. With a few tools and some patience, you can have your trampoline taken apart in no time.
- Remove the legs of the trampoline by unscrewing the bolts that hold them in place
- Take off the safety netting surrounding the trampoline mat
- Fold up the mat and remove it from the frame of the trampoline
- Unscrew the springs that are attached to the frame and take them off one by one
- Once all of the springs have been removed, fold up the frame and put it away until you are ready to reassemble the trampoline
How to Take Down a Trampoline
How to Take Trampoline Springs off Without Tool
It’s easy to take trampoline springs off without a tool, and there are a few different ways to do it. The first way is to use your hands. Simply grab hold of the spring with both hands and pull it out.
If the spring is tight, you may need to wiggle it a bit to get it started.
Another way to remove trampoline springs without a tool is by using a pair of pliers. Grip the spring tightly with the pliers and pull it out.
This method may be easier if the spring is particularly tight or difficult to grip with your hands.
Finally, if you have access to a power drill, you can use that to remove the springs as well. Drill a hole through the center of the spring, then use a wrench or other tool to unscrew it from the frame.
This method is generally quicker and easier than either of the previous two methods.
Whichever method you choose, be sure to exercise caution while removing the springs so that you don’t injure yourself in the process.
Trampoline Disassembly Tool
When you’ve finished jumping on your trampoline for the day, it’s time to take it down so you can store it away. But how do you do that? With a trampoline disassembly tool, of course!
A trampoline disassembly tool is a specialized piece of equipment that is designed to help you take your trampoline apart quickly and easily. It usually consists of a long pole with a hook or claw on the end, which makes it easy to grab onto the frame of the trampoline and pull it apart.
Disassembling your trampoline is simple with a disassembly tool.
First, disconnect the springs from the mat using the hooks or claws. Then, fold up the mat and remove any other parts, like pads or covers. Finally, use the tool to help you take apart the frame by unhooking the poles from each other.
With a trampoline disassembly tool, taking down yourtrampoline is quick and easy – no more struggling to figure out how to do it yourself!
How to Take Apart a Rusty Trampoline
If your trampoline has been sitting in the backyard for a while and is starting to show signs of rust, it’s time to take it apart. Here’s how:
1. First, remove the spring cover by unscrewing the bolts that hold it in place.
If the cover is stuck, you may need to use a pry bar or other tool to loosen it.
2. Once the cover is off, you’ll be able to see all of the springs that are attached to the frame. Using a wrench or pliers, begin loosening each spring from its attachment point.
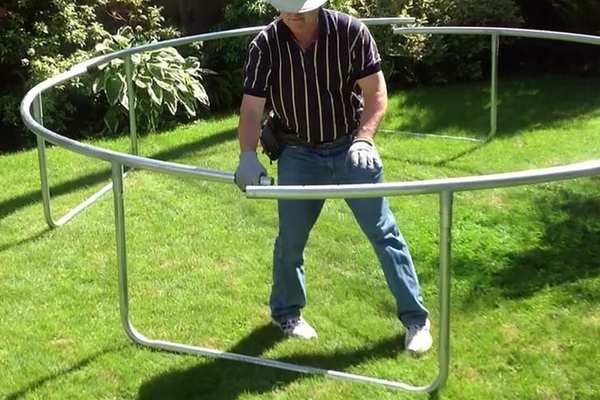
3. Once all of the springs are detached, you can start taking apart the frame itself. Unscrew any bolts or screws that are holding it together, and then gently pull it apart into individual pieces.
4. The last step is to clean all of the parts that you’ve just taken apart.
Use a wire brush or other abrasive tool to remove any rust from metal surfaces, and scrub down any plastic or fabric parts with soapy water.
Once you’ve finished taking apart your rusty trampoline and cleaning all of the parts, you can decide whether to throw it away or try to fix it up and use it again. If rust has damaged too many parts beyond repair, then it’s probably time for a new one – but if only a few pieces need replacing, then fixing up your old trampoline can be a fun project!
Trampoline Frame Stuck Together
If you’ve ever owned a trampoline, you know that they’re great fun for kids and adults alike. But what do you do when your trampoline frame gets stuck together? Here’s a quick guide on how to fix this common issue.
First, check to see if there are any loose bolts or nuts on the frame. If so, tighten them up until the frame is snug. Next, take a look at the legs of the trampoline.
If they’re bent or warped in any way, try straightening them out with your hands or by using a wrench. Finally, check the mat to see if it’s torn or ripped in any places. If so, patch it up with some duct tape or replace it entirely.
With these simple tips, you should be able to get your trampoline frame unstuck in no time!
Trampoline Disassembly Service
If you’re like most people, you probably love your trampoline. It’s a great way to get some exercise, have some fun, and spending time with family and friends. But what happens when it’s time to take it down?
That’s where our trampoline disassembly service comes in!
We know that taking down a trampoline can be a pain, which is why we offer a professional disassembly service. We’ll come to your home, disassemble your trampoline, and even haul it away for you!
All you need to do is give us a call and we’ll take care of the rest!
How to Remove Trampoline Springs
If your trampoline springs are starting to show signs of wear and tear, it’s important to replace them as soon as possible. Not only will this ensure that your trampoline is safe to use, but it will also help extend the life of your trampoline. Here’s a step-by-step guide on how to remove trampoline springs:
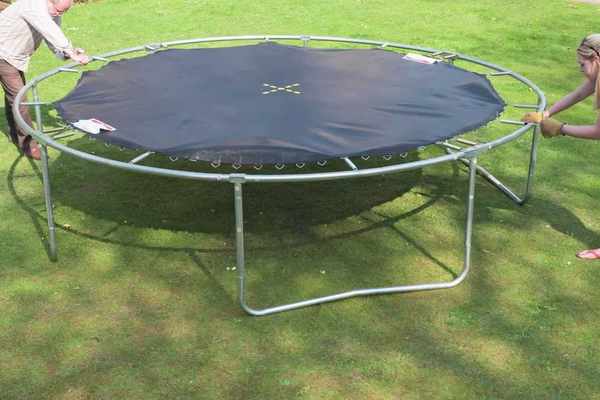
1. First, you’ll need to remove the mat from the frame of the trampoline. To do this, simply lift up one side of the mat and pull it away from the frame.
2. Once the mat is removed, take a look at the springs and identify which ones need to be replaced.
You’ll know it’s time to replace a spring if it is broken, has rust on it, or isn’t as tight as it used to be.
3. To remove a spring, start by unhooking one end from the frame of the trampoline. Then, using pliers or a similar tool, carefully unwind the spring until it is completely removed.
Repeat this process for each spring that needs to be replaced.
4. To install new springs, start by hooking one end onto the frame of the trampoline. Then wind the spring tightly around itself until it is snug against the frame.
How to Take down a Trampoline for Winter
When the weather starts to cool down and the leaves begin to change color, it’s time to start thinking about taking down your trampoline for winter. Here are some tips on how to do it:
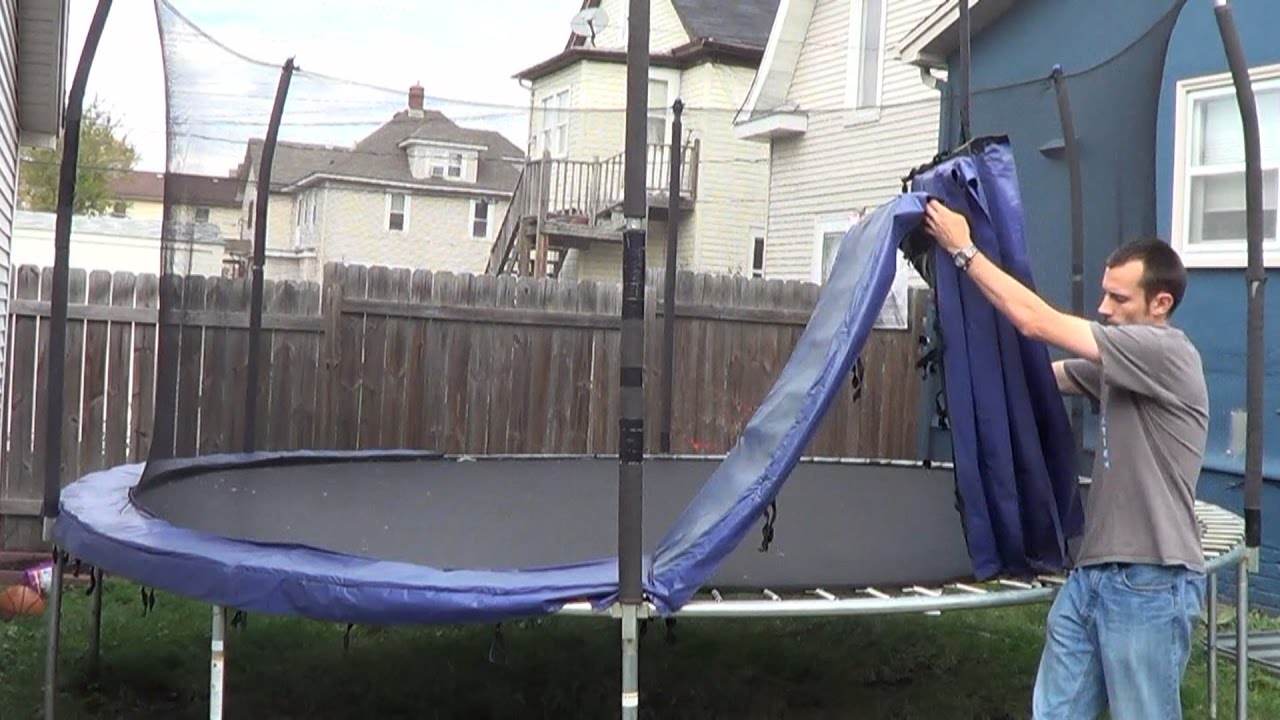
1. First, remove all of the accessories from your trampoline, such as the safety pads, spring covers, etc.
This will make things easier when you’re ready to take the trampoline apart.
2. Next, deflate the jumping mat and remove it from the frame. Once the mat is off, you can start disassembling the frame itself.
3. Take apart each section of the frame and then fold it up for storage. If possible, store the frame indoors to keep it from rusting or getting damaged by weather conditions.
4. Finally, cover your trampoline with a tarp or other type of protective cover to keep it clean and dry until next spring!
Trampoline Disassembly Service near Me
Are you in need of a trampoline disassembly service near you? Well, look no further! Here at our company, we provide professional and affordable trampoline disassembly services to customers all across the area.
No matter what type or size of trampoline you have, our team of experienced professionals can take it apart quickly and efficiently. Plus, we’ll even haul away all the pieces for you so you don’t have to lift a finger!
If you’re interested in learning more about our trampoline disassembly service or would like to schedule a free consultation, please give us a call today.
We look forward to hearing from you soon!
Credit: www.gettrampoline.com
Is It Easy to Disassemble a Trampoline?
If you need to take apart your trampoline for any reason, it’s actually not too difficult to do. You will need a few tools and some patience, but with a little bit of effort you should be able to get the job done relatively easily.
First, you’ll need to remove all of the springs from the trampoline.
To do this, simply unscrew each spring from the frame using a wrench or pliers. Once all of the springs are removed, you can then take apart the frame itself by removing the bolts that hold it together. Again, use a wrench or pliers to loosen and remove the bolts.
With the frame taken apart, you can now remove the mat and padding. These should just be pulled off of the frame – no disassembly required.
And that’s really all there is to it!
Once you have everything taken apart, simply reverse the process to put it back together again. It may take a little time and effort, but taking apart your trampoline is definitely doable if you need to do it.
How Long Does It Take to Disassemble a Trampoline?
It takes about an hour to disassemble a trampoline. This process includes removing the safety net, taking off the padding, folding up the legs, and taking off the spring cover. You will need two people to help with this process.
Can You Take a Trampoline Apart to Move?
Yes, you can take a trampoline apart to move. You will need to disassemble the frame and remove the mat and springs. Once the frame is disassembled, it will be much easier to move.
How Do You Disassemble a Trampoline Without a Tool?
If you need to disassemble your trampoline but don’t have any tools, don’t worry – it’s actually quite easy to do. Here’s a step-by-step guide on how to disassemble a trampoline without any tools:
1. First, remove the safety netting around the perimeter of the trampoline.
If there are any zip ties holding the netting in place, simply cut them with a pair of scissors.
2. Next, locate the spring clips that hold the trampoline mat in place. There should be eight of these clips, four on each side of the trampoline.
Use your fingers to squeeze each clip open and then remove it from the mat.
3. Once all eight spring clips have been removed, you can now lift off the trampoline mat. Set it aside for now – we’ll come back to it later.
4. Now take a look at the frame of the trampoline. You’ll see that there are six legs connected together by metal joints known as “U-bolts”. These U-bolts can be loosened by hand – there’s no need for any tools here.
Just twist each one counterclockwise until it comes loose from the frame (you may need someone to help you hold onto the frame while you do this).
5. With all six U-bolts loosened, you can now fold up the legs of the trampoline and collapse its frame down into a smaller size (this is why it’s important not to lose those U-bolts!). Once collapsed, your trampoline should be much easier to transport and store away until next time!
Conclusion
In this blog post, the author gives a step-by-step guide on how to take apart a trampoline. The process is relatively simple and does not require any special tools. The first step is to remove the legs of the trampoline.
Next, the author recommends removing the spring cover and taking out the springs. Once all of the springs are removed, the final step is to fold up the trampoline mat and put it away.