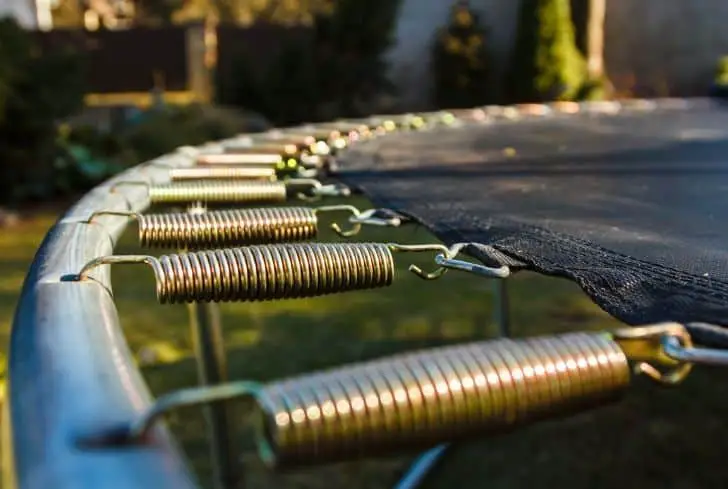
Springs are an essential part of a trampoline and provide the bounce. Over time, however, they can become worn out or damaged and need to be replaced. Removing trampoline springs is not a difficult task, but it does require some basic tools and knowledge.
With a little patience, you can have your trampoline back in action in no time!
- Gather the tools you will need: a socket wrench, a screwdriver, and pliers
- Place the socket wrench on one of the bolts holding the spring in place
- Use the screwdriver to brace the bolt so it does not turn when you use the wrench
- Turn the bolt counterclockwise with the wrench until it is loose enough to remove by hand
- Remove all of the bolts holding the springs in place
- Use pliers to remove any remaining parts of the spring from its housing on the trampoline frame itself
Easy way to remove and install a trampoline mat and springs
Tool to Remove Trampoline Springs
Are you looking for a tool to remove trampoline springs? If so, you’ve come to the right place! In this blog post, we’ll discuss everything you need to know about removing trampoline springs, including what tools you’ll need and how to do it safely.
Removing trampoline springs can be a tricky process, but with the right tools and some careful planning, it can be done relatively easily. The most important thing is to make sure that you are using the correct tools for the job. Using the wrong tools could damage your trampoline or even cause serious injury.
The first step is to identify which type of spring removal tool you will need. There are two main types: a spring hook or a coil winder. A spring hook is designed specifically for removing large numbers of springs at once, while a coil winder is better suited for smaller jobs like removing just one or two springs.
Once you have the right tool, the next step is to safety plan your work area. Make sure that there is nothing in the vicinity that could potentially fall on top of you while you’re working (e.g., branches, power lines). It’s also important to ensure that nobody else will be able to access the area while you’re working – this means keeping children and pets away from the area as well as making sure that any gates are locked.
Now it’s time to get started! If using a spring hook, insert the hook into each individual spring and then pull up on the handle until all of the coils have been released from their housing units. For a coil winder, start by inserting the end of the winder into one ofthe holes atthe bottomofa Spring unit;then twistthe handle clockwiseuntilthecoil hasbeenwound tightlyaroundthewinder (you mayneedto dosethistwo or threetimes beforeitstaysinplace).
Repeatthisprocessfor eachof theremainingSpringsin order toreleasethemfrom their housings Units.
Once all of your Springs have been removed, carefully dispose of them accordingto local regulations – typicallythiswill meanputtingtheminto afreightcontaineror taking themtoyournearestrecyclingcenter .
That’s it!
You’ve now successfully removed your trampoline springs using ____ [insert name of chosen tool].
How to Dismantle a Trampoline
If you’re lucky enough to have a trampoline in your backyard, you probably want to know how to take it apart when the time comes. Here’s a step-by-step guide on how to dismantle a trampoline:
1. Start by removing the safety pads that surround the trampoline.
These can be unscrewed or unclipped, depending on the model of trampoline.
2. Once the safety pads are off, you’ll see the frame of the trampoline. There will be several metal rods connecting the top and bottom of the frame.
3. Begin by taking out the middle rod first, then work your way outwards until all of the rods have been removed.
4. The final step is to remove the springs that are attached to the frame. There will be one spring at each corner, so simply unhook them and set them aside.
And that’s it! Once you’ve completed these steps, your trampoline will be fully dismantled and ready for storage or disposal.
Trampoline Frame Stuck Together
If you’re lucky enough to have a trampoline, you know how much fun they are. But sometimes, trampolines can be frustrating when the frame gets stuck together. This can happen for a number of reasons, but usually it’s because the bolts have come loose or the mat has become misaligned.
There are a few things you can do to try and fix this problem. First, check all of the bolts to make sure they’re tight. If they’re not, then try tightening them with a wrench.
If that doesn’t work, then you may need to replace the bolts altogether.
Another thing you can try is realigning the mat. This can be done by loosening the straps that hold it in place and then moving it until it’s centered again.
Once you’ve done this, retighten the straps and see if that solves the problem.
If neither of these solutions works, then you may need to call a professional to take a look at your trampoline. In most cases, they’ll be able to fix the problem quickly and get you back to bouncing in no time!
Trampoline Spring Hacks
If you’re like most people, you probably think of trampolines as a fun summertime activity. But did you know that there are actually a lot of great ways to use a trampoline during the colder months? Here are some ideas:
1. Use it as a makeshift ice rink. Just put some water in a shallow pan and place it on top of the trampoline. Then let your kids (or yourself) go wild skating around!
2. Have a snowball fight. This is especially fun if you have two trampolines side by side. One person can be on each one, and then you can have a safe (and dry) snowball fight!
3. Turn it into a fort. If you have a large enough trampoline, you can use it as the base for an epic fort or playhouse. Just make sure to put something over the top so that no one falls through!
4. Use it for sledding practice. If you live in an area with snow, but don’t have any hills nearby, a trampoline is the perfect solution! Just put on your sled and zoom down – no hill required!
How to Install Trampoline Springs Without Tool
If you’ve ever owned a trampoline, you know that the springs are one of the most important parts. Without them, your trampoline would be pretty useless. But over time, springs can wear out and need to be replaced.
If you’re in this situation, you might be wondering how to install trampoline springs without a tool.
The good news is that it’s actually not that difficult. You’ll just need a few things from around the house, including a pair of pliers and a screwdriver.
With these simple tools, you should be able to replace your springs in no time!
Here’s a quick step-by-step guide on how to do it:
1) First, remove the old spring from the trampoline frame.
This can usually be done by unscrewing the retaining nuts with a screwdriver.
2) Once the old spring is removed, take your new spring and thread it through the hole in the frame where the old spring was located.
3) Next, use your pliers to twist the ends of the new spring together so that they’re secure.
4) Finally, screw the retaining nuts back onto the frame to hold everything in place. That’s it! You’ve now successfully installed your new trampoline springs without any tools required.
Spring Puller
A spring puller is a device that helps to remove springs from cars or other machinery. It consists of two jaws that grip the ends of the spring, and a ratchet that is used to wind the spring out of its housing. Spring pullers are an essential tool for anyone who works with springs, and can make the job much easier and safer.
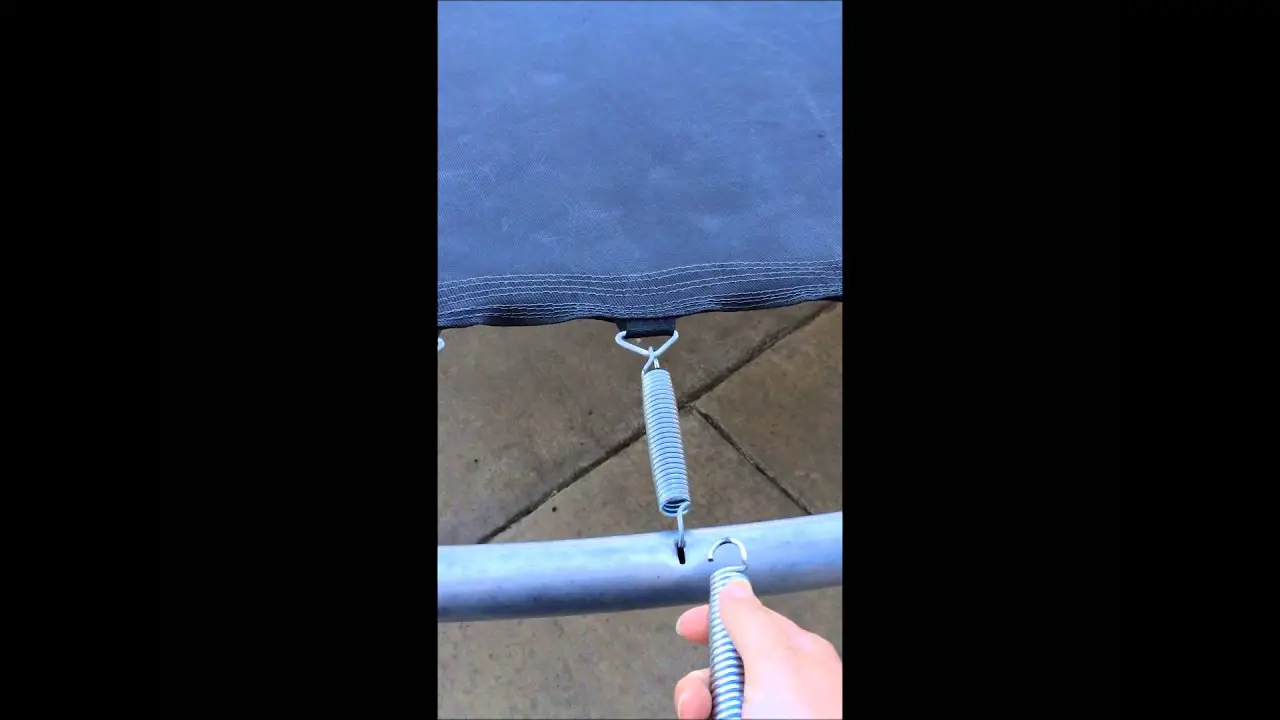
How to Put Springs on Trampoline
If you’re like most people, you probably didn’t give much thought to how your trampoline works – until something goes wrong. Trampolines are actually quite simple machines, and one of the key components is the springs. Over time, these springs can weaken or break, causing the trampoline to lose its shape and become dangerous to use.
Luckily, replacing springs on a trampoline is not a difficult task. In fact, it’s something that most people can do in an afternoon with just a few basic tools. Here’s a step-by-step guide to putting springs on a trampoline:
1) Remove the old spring: First things first, you’ll need to remove the old spring from the trampoline frame. To do this, simply unscrew the spring clip that holds it in place. Once the clip is removed, the spring should come right out.
2) Insert the new spring: Take your new spring and insert it into the hole where the old one came out. Make sure that the coils are facing downwards so that they can properly grip onto the frame when you screw them in place.
3) Screw in the new spring: Using your screwdriver, tighten down onthe new spring until it’s snug againstthe frame.
You don’t want it too tight – just enough so that it won’t move around when someone is usingthe trampoline.
4) Repeat for all other springs: Once you’ve replacedonespring, simplyrepeat these steps for all ofthe othersuntil they’re allnewand secure!
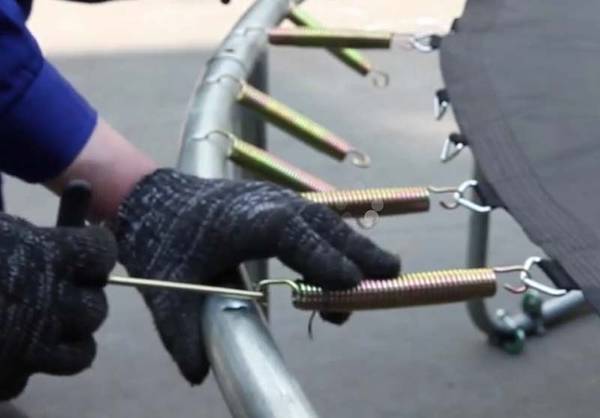
Trampoline Spring Tool in Store
Are you looking for a way to easily remove and replace your trampoline springs? Look no further than the Trampoline Spring Tool! This easy-to-use tool makes removing and replacing springs a breeze, and it’s available at your local store.
The Trampoline Spring Tool is specially designed to fit around the circumference of a trampoline spring, making removal and replacement quick and easy. Simply place the tool around the spring and twist to loosen or tighten as needed. The ergonomic design of the handle ensures comfortable use, even when working with larger springs.
Whether you’re replacing worn-out springs or just want an easier way to take them on and off, the Trampoline Spring Tool is a must-have for any trampoline owner. Stop by your local store today and pick up yours!
Credit: www.gettrampoline.com
How Do You Get a Spring off a Trampoline Without Tools?
If you need to remove a spring from your trampoline, there are a few things you can do. Depending on the type of trampoline, the springs may be removable without any tools. Some trampolines have hooks or loops that hold the springs in place, while others have bolts that need to be unscrewed.
If your trampoline has bolts, you will need a wrench or pliers to remove them.
To remove a spring without tools, start by locating the hooks or loops that are holding it in place. Then, use your hands to pull on the spring until it comes loose.
Be careful not to pinch your fingers! If your trampoline has bolts, unscrew them using a wrench or pliers and then pull on the spring to remove it. Again, be careful not to pinch your fingers!
How Do You Take Apart a Trampoline Spring?
Assuming you need to take apart a trampoline spring for replacement or repair, here are some easy steps to follow:
1. First, remove the mat from the frame of the trampoline. This will give you easier access to the springs.
2. Next, using a Spring Hook Tool, or something similar, unhook each spring from the wire that holds it in place on the frame. You’ll need to do this one spring at a time.
3. Once all of the springs are disconnected, you can then remove them from the trampoline frame altogether.
4. To reassemble, simply reverse these steps – connect each spring back onto the wireframe and then reattach the mat onto the frame.
How Do You Remove a Trampoline Spring With a Screwdriver?
If your trampoline has lost a spring or two, it’s not the end of the world. In fact, it’s quite easy to remove a trampoline spring with just a screwdriver. Here’s how:
1. First, locate the broken spring and identify which end is still attached to the frame. If both ends are detached, you’ll need to find the middle of the spring so you can apply equal pressure when removing it.
2. Use your screwdriver to pry one end of the spring off the frame.
It may take some effort, but be careful not to damage the frame itself.
3. Once one end is detached, simply unwind the spring from around the frame until it’s completely removed. Repeat this process for any other broken springs.
And that’s all there is to it!
Is It Easy to Dismantle a Trampoline?
A trampoline can be a great addition to any backyard, providing hours of fun for children and adults alike. But when it’s time to take the trampoline down, you may be wondering how easy it is to dismantle.
The good news is that most trampolines are designed to be dismantled relatively easily.
In most cases, you’ll just need a few basic tools and some help from a friend or family member. Here’s a quick overview of what you can expect:
1. Remove the safety enclosure first.
This is usually the easiest part, as you can simply unscrew the poles or detach them from the base.
2. Take down the spring cover next. Again, this should be fairly easy, as you’ll just need to remove the screws or clips that hold it in place.
3.Remove the springs one by one. This is where things start to get a little more tricky, as each spring needs to be removed individually (unless your trampoline has detachable springs). You’ll need to use pliers or another tool to unhook each spring from its corresponding connector on the frame.
Once all of the springs are removed, you can fold up the frame and put it away until next season!
Conclusion
If your trampoline springs are damaged or you simply want to remove them for storage, here is a guide on how to do so. First, take all the safety measures necessary, such as disconnecting the power source and removing any objects from around the area. Next locate the springlock which is holding the springs in place and use a screwdriver or another tool to loosen it.
Finally, remove each spring one by one being careful not to lose any parts in the process.