This Skywalker Trampoline is 15′ big and will give your family plenty of room to enjoy some outdoor fun. It’s easy to assemble, too. Here’s what you’ll need to do:
First, find a level spot in your yard for the trampoline. You’ll want to make sure there are no high branches or other obstructions nearby that could present a safety hazard. Once you’ve found the perfect spot, lay out the frame pieces on the ground in the order they’ll be assembled.
Then, begin attaching the legs to the frame using the included bolts and washers.
- Unfold the trampoline and lay it out on a flat surface
- Connect the frame pieces together using the provided hardware
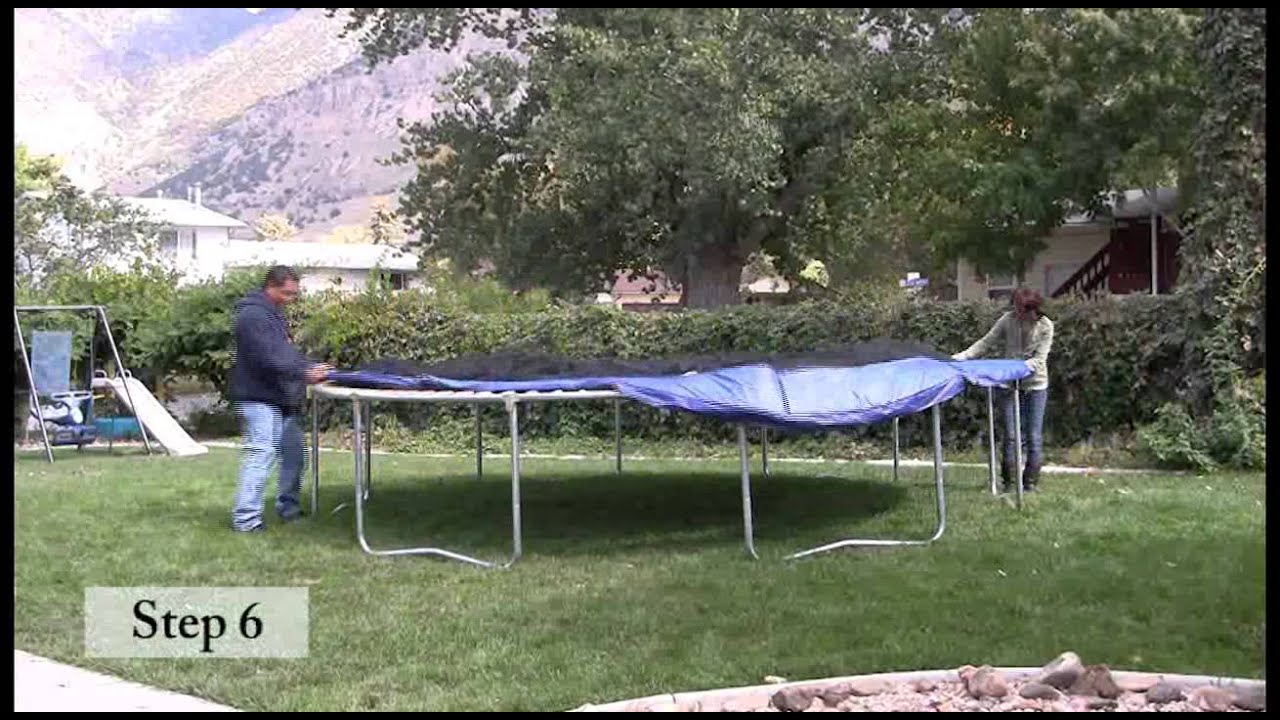
- Stretch out the mat over the frame, making sure that it is taut and free of wrinkles or folds
- Secure the mat to the frame using the provided straps or clips
- Attach the safety enclosure to the frame, following any provided instructions or diagrams
Skywalker Trampolines 15 ft. Round Trampoline Assembly Video
Skywalker 12′ Trampoline Assembly Instructions
The Skywalker 12′ trampoline is a great addition to any backyard. It’s easy to assemble and provides hours of fun for the whole family. Here are the assembly instructions:
1. Begin by attaching the legs to the frame using the bolts provided.
2. Next, stretch out the mat and position it over the frame. Make sure that it’s tight and even all around.
3. Finally, hook the springs into place around the edge of the mat. That’s it! Your trampoline is now ready for use.
14 Ft Trampoline Assembly Instructions
Are you looking for a fun activity to do with your family? Well, look no further than a trampoline! Trampolines are great for all ages and can provide hours of entertainment.
But before you can start bouncing around, you need to assemble your trampoline.
Don’t worry, assembling a 14 ft trampoline is not as difficult as it may seem. With these simple instructions, you’ll have your trampoline assembled in no time.
First, lay out all of the parts on the ground in the order that they will be assembled. Then, begin by attaching the legs to the frame using the bolts provided. Once all four legs are attached, add the springs to the frame.
Make sure that each spring is hooked onto the correct notch on the frame.
Now it’s time to stretch out the mat over the frame and hook it onto the springs. Start by stretching out one side of the mat and then work your way around until it’s fully stretched over the frame.
Make sure that youhook each corner ofthe mat onto a spring so that it doesn’t come loose while you’re bouncing around.
And that’s it! You’re now ready to enjoy hours of fun on your new 14 ft trampoline!
Skywalker Trampoline Assembly 8Ft
Skywalker Trampoline Assembly 8Ft:
Assembling your Skywalker trampoline is easy and only takes a few minutes. Follow these simple instructions and you’ll be up and jumping in no time!
1. Start by attaching the legs to the circular frame using the bolts and nuts provided. Make sure that the legs are evenly spaced around the frame.
2. Next, stretch out the mat over the frame, making sure that it is tight and not saggy in any areas.
Use the spring clips to secure the mat to the frame at each of the corners.
3. Finally, hook up each of the springs to their corresponding hooks on the mat. Make sure that all of the springs are securely attached before allowing anyone to jump on the trampoline.
Skywalker Trampoline 15
If you’re looking for a top-quality trampoline, the Skywalker Trampoline 15 is a great option. This trampoline has a sturdy steel frame and a durable jumping mat, so it can handle plenty of rough play. It also has a safety enclosure to keep kids from falling off, and the padding around the edge provides extra protection.
The trampoline comes with everything you need for easy assembly, and it’s backed by a two-year warranty.
Skywalker Trampoline 15 Ft Weight Limit
If you’re looking for a trampoline that the whole family can enjoy, the Skywalker Trampoline 15 ft weight limit is a great option. This trampoline can accommodate up to 250 lbs, making it perfect for both kids and adults. The heavy-duty construction and safety features make this trampoline a great choice for anyone looking for a safe and fun way to exercise.
Skywalker Trampoline Basketball Hoop Assembly Instructions
Skywalker Trampoline Basketball Hoop Assembly Instructions
Here are the assembly instructions for the Skywalker Trampoline Basketball Hoop. This hoop is designed for use with a rectangular trampoline, and will take some time to assemble.
But following these instructions carefully should result in a successful outcome.
First, locate all of the parts needed for assembly. These include the backboard, pole, base, net, rim, and hardware.
Next, attach the backboard to the main pole using the provided bolts and nuts. Then do the same with the base and net.
Now it’s time to install the entire unit onto your trampoline.
Begin by inserting the main pole through one of the holes in your trampoline’s frame. Once it’s in place, addthe base and backboard. Finally, attachthe rim tothe top ofthe mainpole using more boltsand nuts.
Make sure everything is tight and secure before letting anyone use it!
And that’s it – you’re ready to start playing basketball on your new Skywalker trampoline hoop!
Skywalker Trampoline Strc915.2 Assembly
If you’re looking for a fun trampoline to add to your backyard, the Skywalker Trampoline is a great option. It’s easy to assemble, and with its sturdy frame and safety features, it’s perfect for kids of all ages. Here’s everything you need to know about putting together the Skywalker Trampoline:
The first step is to lay out all of the parts on a flat surface. You’ll need the following:
– The frame (which includes the legs and upper frame)
– The mat
– The springs
– The enclosure netting
– The spring pad (this goes between the mat and springs)
Once you have all of your parts, it’s time to start assembling the trampoline. Begin by attaching the legs to the upper frame using the bolts that are included in the kit.
Make sure that each leg is securely attached before moving on.
Then, take the mat and stretch it over the frame so that it covers all of the legs. Once again, make sure that it is stretched tight and there are no wrinkles or gaps.
Next, attach the springs to the mat using either hooks or loops (depending on which type of spring you have). There should be an even number of springs around each leg – eight is standard.
Now it’s time for perhaps the most important part: attachingthe enclosure netting.
This will keep anyone from falling off ofthe trampoline, so it’s important that it is done correctlyand securely. First, connect one end ofthe nettingto oneof themainframe poles usingthe clips thatare providedin theyoungsterkits( thesecan alsobefound online).Make surethatyouhavea good gripon thenettingbeforeattachingit topole -you don’twantit comings undone whileyou’re working! Continueattachingthe nettingaroundthe entireperimeterofthe trampolineuntilit iscompleteand secureall around.
Lastly, putthespringpadin placebetweenthe matsprings – thiswill help protectanyone whois jumpingfrom being injuredby contactwith themsprings themselves(trustus, nobodywants aspringstickingthem in their side!). Andthat’sit! Onceyoudouble checkto ensurethateverythingis tightenedand secure,yourSkywalkerTrampolinewillbe readyfor hoursupon hoursof funjumpingaction!
Skywalker Trampoline 12
Looking for a fun way to exercise and get some fresh air? Check out the Skywalker Trampoline 12′. This trampoline is great for both kids and adults, providing hours of bouncing fun.
The heavy-duty frame ensures durability, while the safety enclosure prevents accidental falls. With a maximum weight capacity of 200 lbs., this trampoline is sure to provide endless entertainment for your family.
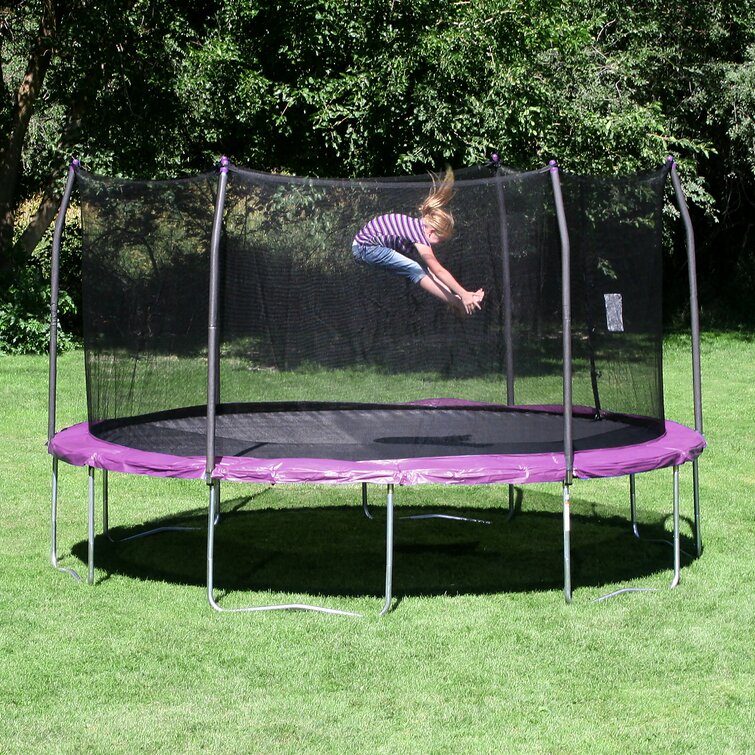
Credit: www.wayfair.com
How Do You Assemble a Skywalker 15 Trampoline?
Assuming you have all the necessary parts, tools and instructions, assembling a Skywalker 15ft trampoline is a relatively easy process that can be completed in around an hour or so. Here are the basic steps:
1. Lay out all of the trampoline parts in an open area.
Make sure you have everything you need before starting assembly.
2. Begin by attaching the legs to the bottom of the circular frame using the included bolts and washers. Hand-tighten each bolt until it is snug, but do not over-tighten as this could damage the frame.
Repeat this step for all four legs.
3. Next, stretch out the safety enclosure netting around the outside of the frame and secure it in place with the attached zip ties or hooks (depending on your model). Make sure that the netting is taut and free of any gaps or holes.
4. Now it’s time to install The mat onto which users will jump is made up of several smaller sections, or “cells.” Many models come with these cells already sewn together into one large piece, but others will require you to assemble them yourself before proceeding. If your mat comes in separate sections, line them up along their edges and stitch them together using heavy-duty thread or nylon cord (a sewing machine can make quick work of this task).
Once all cell sections are securely fastened together, drape them over top of the frame so that they evenly cover all 8 sides/edges.
If your mat has pre-drilled holes along its perimeter, use these holes to attach it tothe frame using springs or other similar hardware (included with most models). If there are no pre-drilled holes, simply tie ropes or bungee cords aroundthe outside edge ofthe mat and loop them over corresponding hooks ontheframe – again securing tightly so that there are no gaps betweenmatandframe.
. Whichever method you choose for attachingthemattotheframe, make surethatitis done securelyandthereareno loosenor gaping areas where userscould potentially get their fingers caught while jumping..
5 .The final step isto add thenbsp;springsto holdthemattotheframeand provide some “give” when usersjumponit.. Mosttrampolineswillcomewithasetofpre-assembledspringswhichcanbefoundinthehardware kit..
How Do You Put Together a Skywalker Trampoline?
Assuming you would like a blog post discussing the assembly of a Skywalker trampoline:
Assembling your very own Skywalker trampoline is actually not as difficult as one might think! With just a few tools and some helpful instructions, you’ll have your new trampoline ready to go in no time.
Here’s what you’ll need to do:
1. Begin by unpacking all of the parts from the box. You should have everything you need, including the frame, springs, mat, enclosure netting, and hardware.
2. Next, lay out the frame on level ground and assemble it according to the included instructions. It’s important that everything is tight and secure before moving on.
3. Once the frame is together, it’s time to add on the springs.
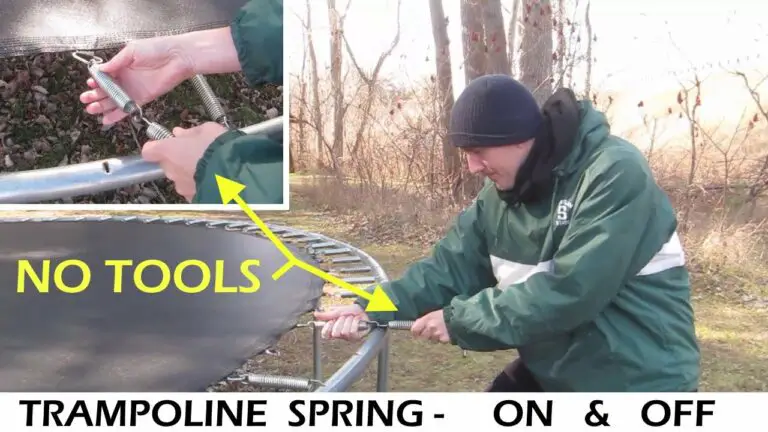
There are typically 96 springs that come with a Skywalker trampoline, which are then evenly distributed around the perimeter of the frame. To attach them, simply hook each spring onto the corresponding hole on the frame using pliers or another similar tool.
4. Now it’s time for the mat!
Unroll it and place it over top of the frame so that all ofthe holes line up with those on the frame (there should be 12 rows of 8 holes). Then start attaching each spring to its corresponding hole using zip ties or metal clips – again making sure everything is nice and tight. Repeat this process until all 96 springs are attached.
5. The next step is to installthe safety enclosure netting aroundthe perimeter ofthe trampoline – this will help keep jumpers safe while they’re using it. First erectthe poles that came withyour kit (typically 4-6), then drapethe netting overtop and fastenit in place using provided straps or hooks at each connection point (wherever two poles meet). Make sure everythingis niceand tightbefore movingon!
Enclosures can also be installed permanently if desired – see manufacturer’s instructions for details on howto do this.)
6Now your new Skywalker trampoline is ready for use! Just make sure to give it a little bounce test before letting anyone else enjoy it – better safe than sorry!
How Long Does It Take to Put Together a 15 Ft Trampoline?
Assuming you have all the necessary tools and materials, it should take no more than an hour to put together a 15 ft trampoline. Here is a step-by-step guide:
1. Lay out all of the parts in an open area.
Make sure you have everything you need before beginning assembly.
2. Begin by attaching the legs to the frame using the bolts provided. Tighten each bolt securely.
3. Next, stretch out the trampoline mat and attach it to the frame using the springs provided. Hook each spring onto a corresponding loop on the frame.
4. Finally, attach the safety pad around the edge of the trampoline mat.
This will help prevent injury if someone falls off while jumping.
With these simple steps, you should have your 15 ft trampoline assembled in no time!
How Do You Assemble a Skywalker Rectangle Trampoline?
It’s easy to assemble a Skywalker rectangle trampoline! Just follow these simple steps:
1. Lay out the four legs of the trampoline frame on the ground, making sure that they are evenly spaced and in line with each other.
2. Affix the two ends of the U-shaped spring onto the corresponding holes on two adjacent legs using the bolts provided. Make sure that the springs are facing downwards.
3. Place the rectangular mat over the frame, ensuring that it is pulled taut and without any wrinkles or creases.
Start at one end and work your way around, attaching it to the frame with VELCRO® brand strips or zip ties.
4. Once all four sides of the mat are attached, you can now install the safety enclosure netting around the perimeter of the trampoline. Begin by tying one end ofthe netting onto a lower corner leg, then stretch it up and over tothe opposite leg before pulling it taunt and securing it in place with another tie.
Work your way around until all sides are complete. That’s it – you’re ready to bounce!
Conclusion
If you’re looking for a fun activity to do with your family or friends, a trampoline is a great option. Skywalker Trampolines are one of the leading brands on the market and their 15′ model is a popular choice. Here’s a step-by-step guide on how to assemble it.
Firstly, you’ll need to lay out all of the parts in an open area. The frame pieces should be placed together first and then the legs can be attached. Once that’s done, the mat can be stretched over the frame and secured in place with the spring pads.
Finally, the safety enclosure can be put up around the outside of the trampoline.
With a little bit of effort, you’ll have your new trampoline set up and ready to use in no time!