A trampoline is a great addition to any backyard. They provide hours of fun for kids and adults alike. But before you can start bouncing, you need to install the trampoline net.
This process is not difficult, but there are a few things you need to keep in mind.
- Lay the trampoline on a level surface and make sure that the legs are fully extended
- Unroll the net around the outside of the trampoline frame
- Stretch the net tight and tie it to the hooks or loops on the trampoline frame
- Repeat this process for each section of netting until the entire trampoline is covered
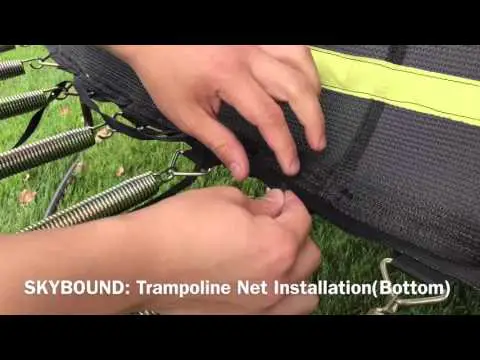
How to Install a New Replacement Trampoline Net (Attaching the Bottom Rope)
How to Install Skybound Trampoline Net
Are you thinking about adding a trampoline to your backyard? A trampoline can provide hours of fun for the whole family. But before you can start jumping, you need to install the trampoline net.
Here’s how:
1. First, lay out the trampoline on level ground. If you’re not sure where to put it, try marking out a 10-foot diameter with chalk or string.
2. Next, assemble the frame according to the manufacturer’s instructions. Be sure to tighten all bolts and screws as you go.
3. Once the frame is assembled, it’s time to stretch out the netting.
Start by attaching one end of the netting to the top of the frame using zip ties or similar fasteners. Then work your way around, stretching and attaching the netting until it’s taut all around.
4. Finally, secure the bottom edge of the netting to the ground using stakes or weights so that it doesn’t blow away in windy weather.
And that’s it!
How to Put a Net on a 14Ft Trampoline
If you have a 14ft trampoline, you’ll need a net to keep everyone safe while they’re jumping. Here’s how to put a net on a 14ft trampoline:
1. Start by attaching the top of the net to the frame of the trampoline.
You can use zip ties or laces to do this.
2. Once the top of the net is attached, stretch it down over the rest of the trampoline and attach it to the frame at the bottom. Again, you can use zip ties or laces for this.
3. Now that the net is securely in place, test it out by jumping on the trampoline and making sure that you don’t fall through!
How to Install Upper Bounce Trampoline Net
If you’re looking for a great way to keep your kids safe while they’re playing on the trampoline, then you should consider installing an Upper Bounce Trampoline Net. Here’s how you can do it:
1. First, you’ll need to purchase the Upper Bounce Trampoline Net.
You can find this online or at most retail stores that sell trampolines.
2. Once you have the net, lay it out over the top of the trampoline so that it covers the entire surface area.
3. Next, use zip ties or similar fasteners to secure the netting to the trampoline frame.
Make sure that the net is tight so that there are no gaps where kids could fall through.
4. Finally, test out the net by having someone jump on the trampoline while you watch from outside. If everything looks good, then your installation is complete!
Trampoline Setup Instructions
If you’re thinking about adding a trampoline to your backyard, there are a few things you need to do to make sure it’s set up properly. First, find a level spot in your yard that’s at least 10 feet away from any trees, fences, or other structures. Once you’ve found the perfect spot, clear away any debris or objects that could get in the way.
Next, it’s time to assemble your trampoline. Most trampolines come with easy-to-follow instructions, so just follow those and you’ll be good to go. Once everything is assembled, take a look around the perimeter of the trampoline to make sure there are no gaps or openings where someone could fall through.
Finally, give the entire structure a good shake to test it out and make sure everything is secure. And that’s it! You’re ready to start bouncing around on your new trampoline!
Trampoline Net Inside Or Outside
Whether you have an indoor or outdoor trampoline, you might be wondering if it’s better to have the net inside or outside of the frame. Here are some things to consider when making your decision:
Safety is always the most important consideration when it comes to trampolines.
If you have young children who will be using the trampoline, having the netting inside the frame can help prevent them from falling off.
Another safety consideration is weather. If you live in an area with severe weather conditions (strong winds, heavy rains, etc.), it’s important to make sure that your trampoline is properly secured.
Having the netting inside the frame can help ensure that your trampoline doesn’t blow away in strong winds.
If you’re worried about aesthetics, an indoor trampoline might be a better option for you. However, if you’re looking for a more budget-friendly option, an outdoor trampoline with the netting outside of the frame can be just as effective.
Sportspower Trampoline Net Instructions
Are you looking for a way to keep your kids entertained this summer? A trampoline is a great option and the Sportspower Trampoline Net is a great choice. This trampoline has a safety net enclosure so you can be sure your kids are safe while they are playing.
The following instructions will help you assemble the Sportspower Trampoline Net.
1. Start by attaching the horizontal poles to the vertical poles of the trampoline frame. Make sure that the hooks on the horizontal poles are facing inwards.
2. Next, stretch out the netting and attach it to the hooks on the horizontal poles. Start at one end and work your way around until all of the hooks are attached.
3. Once all of the hooks are attached, secure them with zip ties or similar fasteners.
Double check that all of the connections are tight and secure before letting anyone use the trampoline.
That’s it! You’ve now successfully assembled your Sportspower Trampoline Net and it’s ready for use.
Trampoline Net Cords, Tie down Rope for Enclosure Nets
If you have a trampoline with an enclosure net, you need to make sure that the net is properly secured. This can be done with trampoline net cords or tie down ropes. Trampoline net cords are made specifically for securing enclosure nets.
They are typically made of nylon and are adjustable, so you can get a tight fit. Tie down ropes can also be used to secure the enclosure net. These are usually made of polypropylene or polyester and can be tied in a variety of ways to get a secure fit.
Credit: funintheyard.com
How Do I Put the Net on My Trampoline?
Assuming you have a round trampoline:
1. Unfold the trampoline and lay it out on a flat surface. If you have a square or rectangular trampoline, skip to step 4.
2. Find the center of the trampoline by folding it in half both ways. Once you have found the center, tie a piece of string around that point. This will be used to help you put the net on later.
3. Take the net and place it over the trampoline so that the middle of the net is at the center of the trampoline where you tied the string in step 2.
4. Now begin stapling or zip-tying the net to the frame of the trampoline, starting at one end and working your way around until you reach where you started. Be sure to stretch the net taut as you go so that there are no saggy spots for people (or pets) to get stuck in when they jump on the trampoline.
Should Trampoline Net Be Inside Or Outside Springs?
This is a difficult question to answer as there are pros and cons to both having the trampoline net inside or outside of the springs. On one hand, having the trampoline net inside of the springs provides more support and stability for the jumper. On the other hand, having the trampoline net outside of the springs gives the jumper more freedom to move around and perform tricks.
Ultimately, it is up to the individual jumper to decide which set-up works best for them.
How Do You Remove the Net from a Trampoline?
If you’ve ever had a trampoline, you know that one of the most annoying things can be trying to remove the netting when it’s time to take the trampoline down. Here are some tips on how to remove the net from a trampoline:
1. First, make sure that the trampoline is completely dry.
If there is any moisture on the surface of the trampoline, it will make removing the netting more difficult.
2. Start by taking off any spring covers or padding that may be around the edge of the trampoline. These can usually be removed by simply unscrewing them or unzipping them.
3. Once you have access to the springs, begin unbolting each spring from its connection point on the frame of the trampoline. It’s important to do this carefully so as not to damage any of the parts.
4. With all of the springs removed, you should now be able to pull up on one side of the netting and loosen it from its attachment points aroundthe perimeter ofthe trampoline frame.
How Do You Put a Trampoline Pad On?
Assuming you have already assembled the trampoline frame, here are the instructions on how to put a trampoline pad on:
1. Unfold the trampoline pad and position it around the edge of the trampoline frame. Make sure that the pad is centered and evenly positioned.
2. Begin attaching the trampoline pad to the frame by tying or latching it onto one of the lower legs of the frame. Use zip ties or bungee cords to secure it in place.
3. Work your way around the entire circumference of the trampoline, attaching the pad to each leg of the frame until it is completely secured.
Be sure to pull the pad tight so there are no gaps between it and the frame.
4. Once all sides are secured, test out your work by jumping on the trampoline a few times. The padding should be firm and provide ample cushioning for safe jumping fun!
Conclusion
Assuming you would like a summary of the blog post titled “How to Install Trampoline Net”:
Most trampolines come with a net enclosure system that helps keep jumpers safe while they’re playing. If your trampoline didn’t come with a net, or if you need to replace an old and tattered one, don’t worry!
Installing a trampoline net is actually pretty easy. Just follow these simple steps and you’ll have it done in no time.